Showing posts with label Linen. Show all posts

Monday, July 20, 2015

Hand Hemmed Handkerchief Instructions

As promised, the photos to accompany my hand-hemmed handkerchief workshop that I taught at Costume College over the weekend.

'Squaring' your piece of fabric by drawing out a single thread.

Cutting along the cut line left by drawing that single thread gives you a perfectly straight line.

Measuring in one inch to draw another thread, then drawing three more threads
towards the center of your work, giving you a 'ditch' of  drawn threads.

Each edge is folded over about 1/4 inch, working around your handkerchief, then folded over again until the folded edge lines up with the outer edge of your ditch of drawn threads.  You have to work sequentially around the piece, otherwise, the raw edges won't tuck in nicely at the corners.
Gently unfold your edges and identify the outermost square out of the nine part square left in each corner.  Carefully trim this square of linen out to reduce bulk at your corners.

Refolding the hem and pining in place.  Press with the iron if necessary.

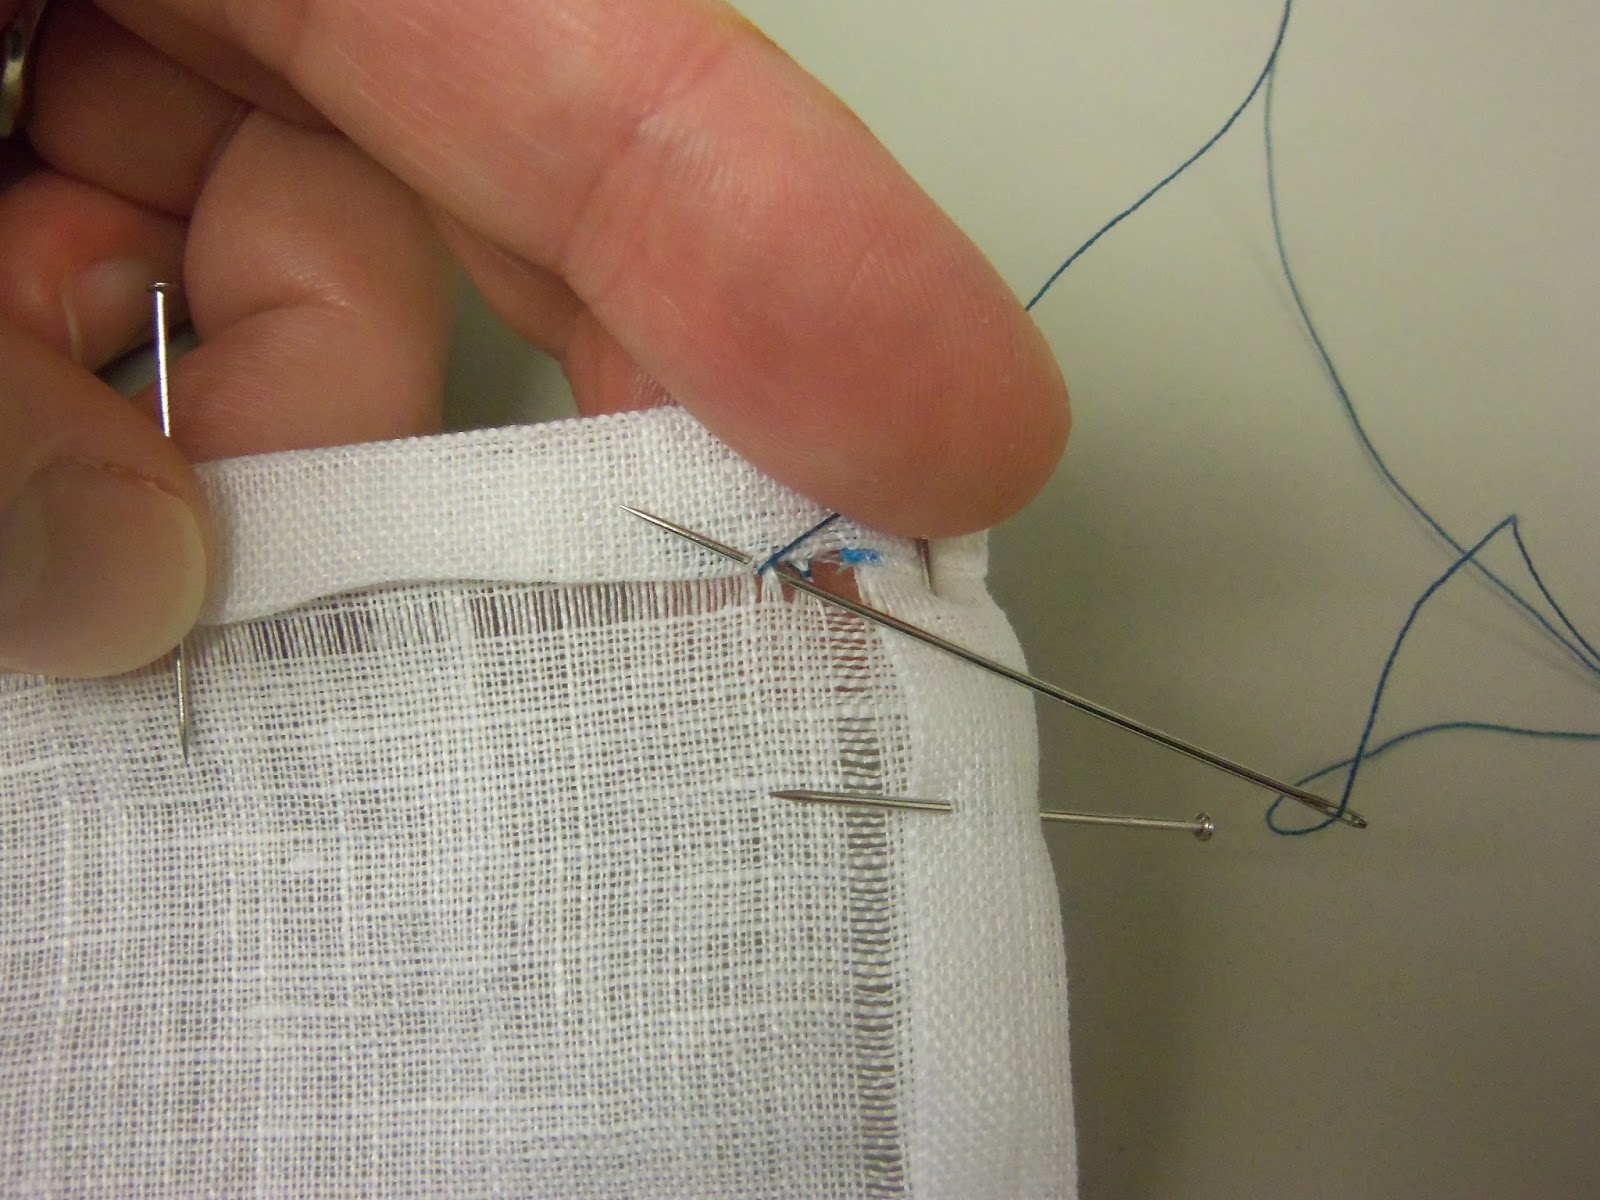
Anchor a single length of waxed thread inside the folded hem where it won't be seen.
Your thread should come out of the folded edge near the gap made by the crossed ditches.

To begin your first stitch, take the needle down through the gap, going under four threads, then coming back up. 

Gently tug the thread to the right to make a small gap between threads.

Take the needle back down through your first hole, then back up through the second, re-tracing the original path.  Only this time, when you come back up to the top side of the work, catch a thread or two of the folded edge of the hem with your needle.

Your thread has wrapped around the four threads in your ditch, pulling them into a wedge shape.
This is the end of the two parts of the hem stitch.

To begin the next stitch, take the needle down through what WAS your second gap from your first set of stitches.

The second part of the second hemstitch on this example.

Repeat your two-part stitches until you get to the end of your work or run out of thread (which will happen on larger pieces).
If you run out of thread, just anchor the end of your thread under the fold of the hem as you did in the beginning.  Then anchor a new piece of thread to continue stitching.

When you get towards the end of a row, you will be picking up a few threads from the cross-ditch instead of a folded edge.

To continue the hemstitch across the corner, use your needle like an awl to shimmy a hole four-threads wide,
by deep enough to encompass all three of the layers folded up at this point.


You may not be able to take the "down and back up" in once stitch like you've been doing thus far without the gap you've made shifting on you.  If so, just take your needle straight down and all the way through your work, then come straight up from the bottom.  It's a touch slower, but you'll only be doing this at the very end.

When you've completed your row, you can either pass your thread through the middle of the corner and begin work on your next row, or you can anchor the thread by taking 3 or four short stitches back and forth within the corner.
 
If you decide that this corner nonsense is too fiddly, don't sweat it.  You can also secure the hem on the corners with a series of neat whip stitches.  Only someone examining your work very closely would be able to tell.

It's not such a big deal on work with a narrow hem, but if you're doing something larger like a table cloth or pillow case, you can use a whip stitch  to close up the open edge at the corner.  Totally up to you.

Thursday, April 2, 2015

HSM April: War & Peace - the 14th Century Linen Coif

April's Historical Sew Monthly Challenge was War & Peace: The extremes of conflict and long periods of peacetime both influence what people wear.  Make something that shows the effects of war, or of extended peace.  

After getting dressed up for pictures in my new side-less surcoat, I was reminded that, while I love having the veil, I hate the work it takes to get it on right.  I had been wearing my veil pinned to a matching silk fillet (strap around the head) and barbette (strap under the chin), but the process of pinning those pieces in place, then pining the veil to them had grown cumbersome.  I was looking for something both more secure, and requiring less fiddling to get and keep on straight.  Hence the coif!

There are any number of excellent patterns and instructions out there, but the one that I found most useful was posted by the Maniacal Medievalist, which used lots of measurements and math to get something close-fitting and properly fit.  I made slight alterations to the pattern in that edge against the face is bound in the same narrow strip of fabric that extends down into the ties, rather than having a turned under edge with separate ties attached.  I felt that this made my ties more secure, but had the drawback of leaving me with short ties, due to the size of the scrap of linen that I was using.  As much as having things secured under the chin tend to annoy me, I'm thinking I may just leave the ties undone, or tie them instead behind the neck.  Either way, the cap stays relatively secure.

I left a bit of ease in the back so I'd have a place to stuff my hair, if I succeed in growing it out.


Octopus made a fantastically patient model for me while I kept fiddling with camera settings.


Seen from the back.  Lower edge was turned under twice and whip stitched.

Once the cap was complete, I tried it on and was a bit disappointed in the center seam.  The two pieces were sewn together, then the seam allowances folded back under themselves and secured to their respective halves. I was a touch unsure about the security of the seam, and so decided to do some sort of decorative top-stiching to secure it.  Well that went downhill and I ended up doing a more elaborate layered herringbone design reminiscent of some of the St Birgitta's caps I'd come across in my research.

Detail of the herringbone stitching down the center seam.
The details for the challenge

What the item is (and how it is a product of war or a lengthy period of peace: Medieval linen coif.  I kind of see the entire medieval period as an unsteady period of war and peace, and war again.  However, 600 years in the future, historians could probably say the same of today.

Fabric: lightweight white linen
Pattern: here
Year: 14th century
Notions: linen thread, bamboo viscose crochet thread for the embroidery
How historically accurate is it? 9.5/10, with a half-point docked for the embroidery thread
Hours to complete: about 8, starting from measuring and drafting out the pattern.  About half of that was spent on the embroidery.
First worn: Planning to wear it for Figments & Filaments later this month
Total cost: maybe $2.  All of the materials were in the stash and really only a very small bit of them had to be used.


Thursday, February 26, 2015

Medieval Fantasy Kirtle and Paternoster (Rosary Beads)

So I made myself a second kirtle for a medieval fantasy group project that I got roped into and I found myself wanting to come up with an outfit to wear it with.  Hence the non-specific Medieval fantasy-like project was born.

I used Burda 7977 for the kirtle and ended up fitting it with bust darts to give it a bra-less snug fit, so not terribly historically accurate, but comfy as hell.  Darts were a much easier fix to do when fitting myself, as opposed to trying to re-work the armscye.  There is not enough yoga in the world that would let me do that properly and I was too impatient to wait for help.


The dress is a mid-weight (4.7 oz) linen from Dharma Trading Co, dyed a pale green to match the details in the as-yet unfinished overdress.   Machine sewn for all weight-bearing construction seams, since learning when to say no to hand-stitching is one of my goals in life.  But I did cave and tack down the felled seams by hand.


This is the second time I've made up this pattern, but the first time that I attempted the double sleeves thing it has going on.  They actually turned out pretty nice and I think I'll leave off the lacing on the over sleeves so that they hang open a bit for some flair.


Here you can see the hand stitching to finish the seams, as well as where I used gold silk thread embellishment to hide the top-stitching around the neckline, which was also how I treated the lower edge of the cuffs of the over sleeve.


Once it's on me and I'm wearing shoes, the hem will sit just off the floor.


While I was fitting with the back safety-pinned closed, I realized that I could slip the dress on and off without un-pinning it.  Therefor, the lacing didn't have to be strictly functional.  So to save a truly epic amount of time, I skipped binding the eyelets and just gently used an awl to help thread a rayon yarn through the edges.  I was able to keep my lacing intervals much narrower this way, so to avoid too much puckering of the center back when worn.


I came across the idea for a paternoster while browsing through medieval costume sources online, looking for accessory ideas.  While not a particularly religious person myself, I latched onto the notion of the rosary being an acceptable way for individuals to express their tastes and show off wealth, without being considered "too flashy" in doing so.  As the outfit I was making was gearing up to be an upper class representation, the rosary became an essential accessory.  Sarah Edgecumbe has put together a fantastic pinterest board on the topic, with LOTS of references from paintings.  Also, paternoster-row.medievalscotland.org, as well as this SCA paper were super informative.

I ended up making mine from materials that I already had on hand.  Fifty 5/16" light red beads meant to resemble coral, separated by larger beads of "jade", also quite decadent.  Christ Laning has an entire blog post devoted to the red beaded paternooster that helped cinch my choice of beads.  My fantasy lady apparently has expensive and exotic tastes.  I strung them all on gold silk cord and I made a small tassel from the same.


The whole thing isn't large, but just enough to wear wrapped around the wrist and offer me something for my fidgety hands to play with.


Monday, July 21, 2014

WIP: Man's 18th Century Court Suit

We're into the home stretch of getting ready for Costume College.  People at work have started noticing that I've got a vacation coming up, so they're asking about where I'm going and those inquiries usually lead to questions of "Are all of your costumes done?"  I usually just laugh and try not to cry.  Costumers are NEVER done.  We just run out of time and sequins.  There's no time for a proper write up, of anything, and it feels like most everything is in a state of almost done, so how about a photo-heavy sneak preview of what I've been working instead.

Honey is getting an 18th century court suit to be my escort to the Gala.  I had to start the costume from scratch and did so at T minus 28 days before con.

Linen shirt, linen stock and fall-front silk tafeta breeches.


The breeches were lined in cotton flour sack material from my grandmother's stash.  While the opacity was necessary, it adds a touch of bulky that, when combined with the extra roomy seat of the style and the "plastic-ish" shwerpiness make them kinda diaper-like.  Oh, my honey must love me, to wear something so unflattering.

Final fitting of the waistcoat before buttons and top-stitching.  I ended up trimming off about two inches of the upper neck area where it's folding back in the photo.  Adding a safety pin to close the cuffs really helps the look of the sleeves.

Adding the waistcoat does help tone down the ridiculousness of the bum fluff.  Not that the whole thign won't get covered up by a coat, anyway.  I saw it written in somebody's blog that the terribly unflattering seat of the pants just helps encourage the modern gentleman not to do anything so terribly inappropriate as take off their coat.  :)


And a shot of the knee band and buckle, of which I am terribly proud.  I found that lovely bit in the jewelry section intended as a photo fram for a necklace.  The plastic backing was held in place by a horizontal metal band, so rip out the plastic and trim off the loop for the necklace and Viola!  We have a buckle.

Since the fitting photos, I've finished up the buttons and button holes on all three pieces, as well as the top stitching on the waistcoat.  Now I just need to find some white tights that'll pass as stockings and finish up the coat, and that outfit will be done.  And by "finish the coat", what I really mean is "stop procrastinating because you think it's going to be hard and just get on with it already.  I have the mock up cut out, so at least it's started.  I don't fly out for another eight days yet.  I've got plenty of time.

I think.

Thursday, July 17, 2014

HSF #13 Under $10 - Man's 18th century Stock

At first I was despairing when I thought that NOTHING of the gentleman's court suit I was working on would count towards any of the current challenges. (not paisley or plaid and CERTAINLY not cheap). But then I realized that one of the accessories that I was considering certainly would and all was saved. 

My honey's court suit needed neckwear, so a stock it would be.  I mostly followed the garment detailed in Costume Close-Up (only with WAY less pleats).  I happen to be one of those people who abhore ironing, so I chose to sew down all of the pleats.  I went with the terribly mathematically accurate method of using the in- and outside of the presser foot to measure my pleats.  There is a strip of linen scrap left over from the shirt that forms the interlining of the stock and the base to which the pleats are sewn down to.
Measuring up from the bottom one half the width of the presser foot anchors the inside of the pleat.


Flipping the outer layer back down away from the interlining and sewing one quarter the width of the presser foot makes for a (relatively) sharp crease when the layer is folded back up.

I ended up straying from the instructions in the book when it came to the back closure.  Not wanting to put out the money for an authentic reproduction stock buckle, I took myself off to my local crafting supply store and found a set of metal buckles intended for scrapbooking. 


$3.49 for a set of 8?  Don't mind if I do.

I also had to deviate when it came to the tabs for buckling.  I had a lot of trouble getting a linen tab to taper off sharply enough to be able to fit through the buckle.  After my first couple of failed attempts, I got frustrated and just cut the damn thing off, fitting a piece of silk ribbon into it's place.  The ribbon was easier to thread through the buckle and could be cinched blindly while worn for easy adjustment.  Not the prettiest bit of sewing I've ever done, but it'll do.
The largest was a touch small for the stock, but it was light weight.  As my honey was already concerned about stuff wrapped snugly around the neck, I decided not to use something small.  Although, in retrospect, this size might have gone better on the knee band of the breeches and the fancy buckle I used there would go better on the stock.  Ah well.


Only downside to sewing down the pleats is that it makes the finished product a bit stiff.  Or else I've made it too wide for my Honey's neck.  Probably a bit of both.  Either way, I'm going to run the whole thing through the wash a couple of times, to see if I can't get it to give up a bit of the fight.


With the coat collar covering some, and a wig covering most of what's left, the back closure really isn't going to be seen all that much.  I'll probably just have him tuck the ribbon tail into the neck of the waist coat and call it good.

For the HSF: 
What the item is: Man's Stock (formal neckware)
The Challenge: Under $10
Fabric: handkerchief weight linen outer, mid-weight linen interlining.
Pattern: Costume Close--Up #24
Year: later half of the 1700s
Notions: poly thread (internal stitchings), linen thread (top stitching), a scrap of silk ribbon to replace a too-thick tab and a buckle from a set intended for scrapbooking.
How historically accurate is it? the part you'll be able to see is pretty spot on. I used the machine to sew down all of the pleats so that I wouldn't have to re-iron every single one of them whenever it was washed. But I didn't want to put out for a proper recreating stock buckle and so used what I could find. Plus I didn't size down the tab sufficiently for easy buckling, so I had to replace the tab with ribbon. I'll give it a six out of ten.
Hours to complete: about three
First worn: another piece ready to pack for Costume College.
Total cost: uses mere scraps of a $15/yd piece of linen. Even counting the full cost of all of the buckles in the set that i didn't use, we're still at under $5.

Thursday, December 5, 2013

HSF #24 Redo, Part the Third: Revisiting the White Challenge with an 18th Century Apron


When I was in grade school, I once got an assignment back with no markings beyond "Redo!" written across the top.  I thought it was an exclamation, like Yay! or Wow!  Oops.  So going back on that theme of "You tried, but obviously not very hard.  Let's try it again," I'm revisiting Challenge #15: White.  At the time, the best I could come up with was a white cotton bum roll stuffed with polyfill.  Now that I've finished the stays, though, I'm discovering that I don't really need it.  I'm fairly well pear-shaped to begin with, and the stays only make that more pronounced.  I rather like the way my petticoats hang on their own and the bum roll just makes everything sharp and shelf-like.  So the middle class, 1870s -ish costume that I've been working on throughout the year is getting a new 'something white.'  This time, the near ubiquitous white linen apron.

Diary of a Mantua Maker has a fantastic post of her research on the wearing of aprons in the 18th century.
And then there was this Pinterest board of 18th century aprons.
Some other sources of inspiration:

The whitework apron on this this lot from Christie's auction house.

LOVE the apron over this robe à l’anglaise (c. 1780) from The Royal Ontario Museum.

I knew I wanted the apron to be somewhat functional, so I chose a mid-weight, 4.7 oz white linen for the body.  I wanted there to be some sort of interest to it, rather than just a plane white square, but a ruffle of self fabric just seemed like it would be too bulky.  So instead I turned to white work embroidery.  I made a cardboard template using a tin of lip balm and used that to draw my scalloped pattern near the bottom hem of the apron.  I ran a running stitch along the lines and then began the tedious process of  satin-stitching a narrow border along the scallops.

Hard?  No.  But very tedious.


The back side of the scallop edges were dabbed with Fray Check and then carefully cut out.

Instead of having a separate waistband and ties, I chose to use a single piece of 1.5" rayon ribbon to do the job of both.  I used it as a double fold binding over the top of the apron, which lays flat at the center front, but is gathered at both edges.  I then continued the fold to the ends to make the ties.  The ties are long enough to wrap around twice, so that they tie in the front.  I used the ribbon instead of self fabric in order to avoid adding too much bulk at the waist.


The Challenge: #24, Redo

The Challenge you are Re-do-ing: #15, White

Fabric: 4.7 oz white linen

Pattern: none

Year: 1770s

Notions: rayon ribbon, silk and linen threads

How historically accurate is it?  Hmm, hand sewn and period-appropriate embroidery vs Fray Check and modern ribbon.  I'll give it a 6/10.

Hours to complete:  About 10.