* * *
Hanbok: Traditional Korean Women’s Dress
 |
| © Eric Lafforgue Photography, http://www.ericlafforgue.com/ |
Costume Con 31
Historical Masquerade
Ethnic Dress Category
* * *
Introduction
When my wife’s college friend moved back to the United States after seven years in South Korea, she brought us gifts. To me, she brought fabric.
Among the treasures was an interesting piece of synthetic organza in two colors, with embroidered designs placed (so I thought) haphazardly around the piece. I quickly took to the internet to determine just what one would make out of dress fabric in Korea and that’s how I discovered hanbok. Hanbok is the combination of a jeogori (short bolero-style jacket) and chima (high-waisted wrap-around skirt). I soon came to believe that the fabric piece was intended to be made into a jeogori, and this entire costume is built upon it.
My goal
To design and create a complete outfit built around a modern hanbok using the material gifted to me by a friend on her return from South Korea.
* * *
History of the Hanbok
The basics of the Korean style of dress were established as early as the Three Kingdoms’ period (c. first century BC to the seventh century AD), and they have remained conceptually similar through the present day. Painted murals from the Goguryeo kingdom, which date from the third to the sixth centuries AD, clearly show the early forms of Korean dress.
 |
| Traditional Korean Costume, page 8 |
Any major changes that Korean clothing was to undergo between then and the modern era took place over the next thousand years, so that by the beginning of the Joseon period (1392-1897), the characteristics of traditional hanbok were essentially in place. Despite foreign influences on Korean society from the Chinese, Japanese and the Russians, the traditional features of Korean dress survived. While Korean traditional dress may have incorporated stylistic elements from these foreign sources, the Koreans also retained their own indigenous style, characterized by the beautiful shapes, colours and fabrics found in hanbok’s traditional garments.
 |
| Traditional Korean Costume, page 13 |
With regards to the women’s hanbok, as the Joseon period progressed, the jeogori became shorter, while the skirts grew ever more voluminous. But what the jeogori lost in length, it made up for in decorative devices, such as bright colors, long breast ties and norigae. Hairstyles also grew more pronounced, and there was widespread use of extravagant hairpieces and ornamentation. While styles have modernized with the times, women’s hanbok is conceptually quite similar to what was worn at the close of the Joseon period. Cut and materials may change, but the essential elements of Korean dress persevere.
Today, it is most common to see Korean women wearing hanbok on national holidays, New Year’s Day, and other festive occasions. The traditional costume is also worn to celebrate a child’s first birthday, when attending funerals, and at weddings.
* * *
Inspiration
The variety of hanbok in existence is frankly astounding. Luckily I had already selected the fabric for the jeogori and the rest of the outfit could be built around a jeogori with a light-colored body and darker cuffs and neckband, embellished with silver and pink flowers and butterflies. From there, I picked a chima that was darker in color, to fit more comfortably with my own personality. Included below is a small selection of some of the images which I found most influential in choosing the style of my hanbok. |
| Wedding Inspirasi |
 |
| http://tesserae.blogspot.com/2010_07_01 |
 |
| Kayla's Korean Adventure |
* * *
The Construction Process
The Jeogori
The jeogori is only a small part of the whole of hanbok, yet it is a very busy piece. Lavish fabrics in bright colors and decorative stripes, embroidery or other ornamentation make the jeogori quite eye-catching. The jeogori closes with a pair of ties or sashes called otgureum, which are often brightly colored and adorned with designs of their own. The otgureum is tied into a single bow knot and the tails allowed to flutter as the women walks. Additionally, the neckband of the jeogori contains a narrow strip of detachable white paper or fabric which can easily be removed and replaced so that the jeogori itself requires less frequent laundering.
The fabric for the jeogori is where this entire project began. Brought back from South Korea as a hostess gift, the fabric came in two colored parts, each with oddly shaped and arranged embroidered designs and bearing the same background pattern woven into the fabric. The fabric was 22.5” wide and the length split into two sections: 104” of aqua and 24” of the teal.

An initial mockup was made which was a true representation of Folkware #141 using scrap fabric. This step was crucial for me to learn how this garment of non-western construction would piece together. Particularly troublesome was understanding how the lining of the angled cuffs would fold back under and lay smoothly. Difficulties with this step led me to choose a more delicate lining material for the cuffs to facilitate ease of finishing. Adjustments were also made from this step to lengthen the arms, widen the neck opening and lengthen the body of the jacket to cover the waist ties of my chima.

A second mockup was cut, taking the above modifications into account. Having already established the assembly and finishing, my focus for this step was to adjust pattern pieces to best utilize the irregular placement of embroidered patterns on the irreplaceable piece of fashion fabric brought back from South Korea. Additional vertical seams were put into the right and left front pieces and the body of the sleeve was shortened in order to fit the narrow width of the fabric. The cuffs were lengthened to compensate for this change. The neck band piece was asymmetrically split into two pieces to allow for making the neckband out of darker contrasting color to match the cuffs.
.jpg) |
Hanbok circa 1950s displaying seams in the left and right front panel of the jeogori.
Photo from Etsy seller julzz4u |
 |
| Neckband and dongjeong top-stitching detail, from hanbok-boutique.com |
 |
| Second mock up, showing divided front left piece. |
In making the mock ups, I discovered that I was unhappy with the way the pattern handled the dongjeong, the strip of white around the neck band. The pattern called for a strip of twill tape or ribbon to be sewn into the neck-facing seam of the neckband and serve a decorative purpose only. As the dongjeong was originally made of paper and designed to be a replaceable mode of keeping the collar of the jeogori clean, I wanted to do something similar. As paper would have been uncomfortable against the skin, I instead used a 1.5 inch wide piece of white silk ribbon folded over the neckband seam and top-stitched into place.
 |
| The second mock up was disassembled and used as pattern pieces |
 |
| The window was used as a backlight to check the placement of embroidered details on the jeogori pattern pieces prior to cutting. |
Although the pattern called for a bag lining of the body and unlined sleeves, I was concerned that the seams would show through the somewhat transparent fabric. I instead flat-lined all jeogori pieces with either white habotai silk (for the lighter aqua pieces) or a dark teal silk from the stash for the darker fabrics of the neckband and cuffs. The lining fabric for the front pieces was cut against the selvedge and seams bisecting the front pieces were ironed flat and left unfinished to reduce bulk. Seams under the sleeves, at the arm and at the shoulders were hand-finished with a flat-felled seam and care was taken that the stitches not show through on the outside of the garment.
 |
| Dark colored basting stitches were used to flat line the fashion and lining fabric together to facilitate their removal later. |
 |
| Snap closures and piping on garment displayed by Rosie Thorn in her panel Traditional Korean Clothing 101, presented at Nak-Kon Anime Convention in March of 2013. |
I chose to add piping to the jeogori so that a contrasting color could be brought in to emphasize the borders between light and dark fabrics. A bright pink was chosen to echo some of the subtle coloring in the embroidered floral embellishments. I wanted to use the remnants of the habotai silk to keep the piping from being bulky. The silk and the cotton cord were dyed in the same dye bath using fuschia Rit dye, which is designed to work on both plant and animal protein fibers equally.

I also chose to add a snap closure to the front of the jeogori to bear any weight put on the front closure. This way, the shape of the otgureum, or bow, would not be affected by pull from wear. As the fabric from the cuffs and neck band of the jeogori was in short supply, I choose to instead make the otgureum out of ribbon in a complementary color. As the piecing of the body of the jeogori left one orphaned bit of embroidery, this was utilized as decoration at the end of the top ribbon.
 |
| My jeogori |
 |
| Detail of otgureum with applique made from leftover jeogori fabric scraps. |
 |
Close up of my jeogori showing piping, otgureum and dongjeong. |
The Chima
Chima refers to a wrap-skirt consisting of a number of panels sewn together and gathered at the waist with ties to tie the chima firmly, minimizing the prominence of the breasts. The chima did not undergo as many changes throughout history as the jeogori, however, in the late nineteenth century, the hem of the skirt was raised off of the ground and the waist pleats became wider among ‘modern’ women, those who were open minded about Western culture and clothing styles. This modernized version of the chima, with suspender-like shoulder straps attached to the waistband, enabled women to move more freely and wear the waistband of their chima looser. |
| Traditional Korean Costume, page 251 |
 |
| newsen.com |
 |
| Chima from hanbok-boutique.com which had shoulder straps of a contrasting color. |
Folkware #141 was only lightly referenced in the making of the chima. Modifications to the pattern: chima size adjusted to utilize three widths of the red poly satin in order to take advantage of the selvedges and avoid the need to finish seams, which limited bulk and kept a smooth line. The pleating guide disregarded in favor of a gathered waist.
I added an organza overlay as I felt that the chima was too plain on it’s own. For the overlay, the width of the fabric was used as length so that there are no seams, only chiffon hemmed edges. The ties were changed to organza strips instead of pieced ties matching the body of the skirt because organza would hold the knot better than the poly satin. The lime green shoulder straps were made with a piece of grosgrain ribbon from the stash.

 |
| My chima, full frontal |
 |
| My chima, back view |
Sokchima
The sokchima is the petticoat worn under hanbok. While many styles are available, I chose to recreate one which combines a breast-binding sleeveless top with a bodifying skirt. |
| hanbok-boutique.com |
I wanted my sokchima to serve multiple functions and so I chose to recreate a style of petticoat with an top portion which could provide some support across the breasts. I drafted my own pattern for a double-layered top out of white rayon which would be soft to the skin, breathe well and not show through the light colors of the jeogori. The neck and arm holes were bound with silk ribbon. I paired this with a dark purple skirt portion, largely to use up the large quantity of dark purple synthetic lining fabric that I had leftover from making dresses for my wedding. Although the examples of petticoats that I could find were all white, I felt that it was not necessary to purchase additional fabric in white when the chima I was making was quite dark and opaque. The center back of the top portion closes with bra strap hook-and-eye closures. The skirt is made in two layers, with net ruffles attached to the base layer. Each layer of ruffle was cut approximately double the circumference of the petticoat and then pleated to fit. A wide band of white lace trims the hem of the sokchima so that it might be visible as I walk.
The following diagram displays the math utilized to determine the appropriate size of skirt for the base layer of the petticoat. The top layer is cut to be the same diameter as the finished chima. The petticoat is intended to fall close to the same length as the chima, so that the lace detail may peak out.

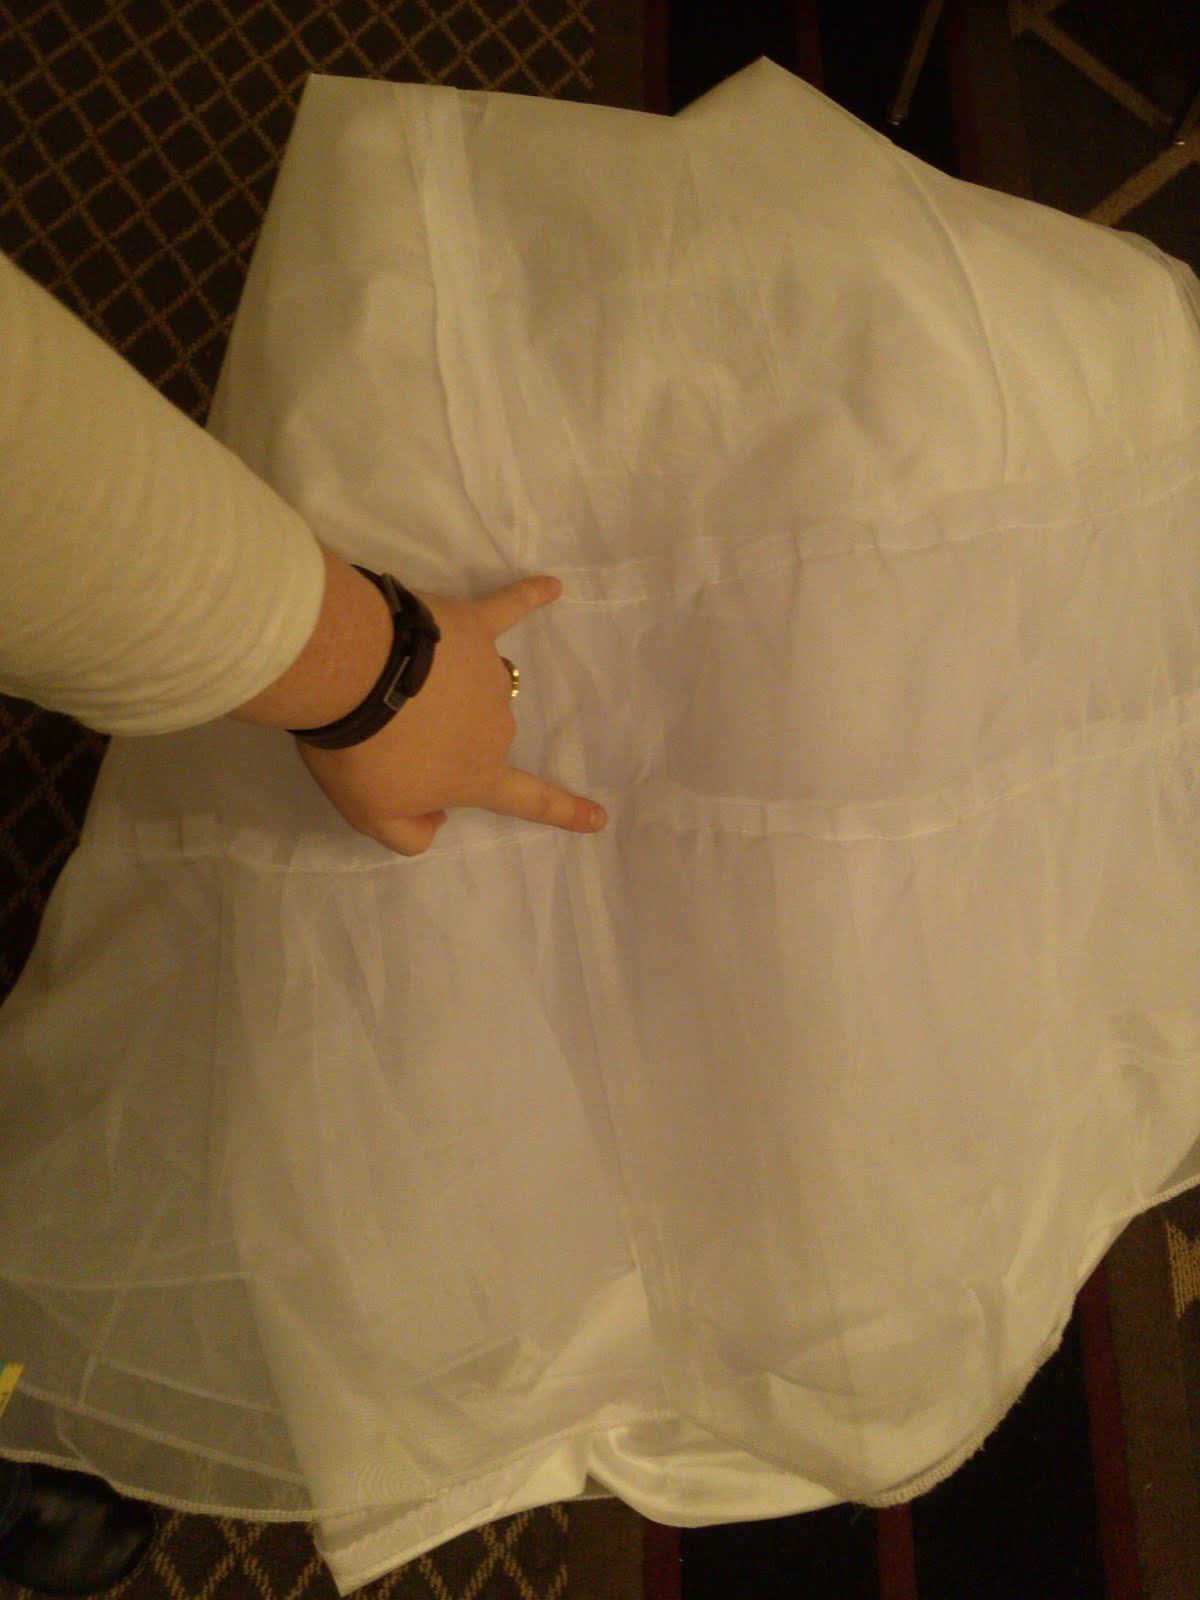
Measuring the distance between ruffles (approximately six inches) on garment presented
by Rosie Thorn in her panel Traditional Korean Clothing 101, presented at Nak-Kon
Anime Convention in March of 2013. |

 |
| My sokchima |
 |
| Back of my sokchima |
* * *
Accessories
Hairstyle and Ornamentation
Both men and women wear hair ornaments for practical and decorative purposes. Before marriage, both men and women wore daenggi, a ribbon tied at the bottom of their long braids. After marriage, it was customary to wear the hair up: women in chignon buns and men in a topknot. Both sexes used a hair stick to hold these hairstyles in place. The ornament for women was the binyeo, an asymmetrical stick of varying length with decorative stones or carving on one end. The chignon were also often decorated with vertically inserted ornamental hairpins called dwikkoji. The wearing of multiple dwikkoji was common and popular designs included flowers such as the lotus or plum blossom, butterflies or the phoenix. |
| http://askakorean.blogspot.com/2010/03/traditional-korean-hairdo-for-women.html |
Jjokjin meori is probably the most classic Korean hairstyle for women, and it is popular to this day. Jjokjin meori is formed by first parting the front part of the hair and then tying braided hair into a bun in the back of the neck.
The binyeo is utilized to help the chignon hold it’s shape. The materials and design of binyeo show significant variation. Binyeo could be made with gold, silver, jade, wood, bamboo, or animal bones, and popular designs include symbols for phoenix, dragon, wild ducks and lotus flowers. The size of the binyeo can also vary -- some of the decorative binyeos for ceremonial wear were as long as two feet!

I simulated the look of jjokjin meori by making a chignon bun out of a braid of false hair, which is attached to a comb with auburn colored satin-finished embroidery floss. The idea for such an appliance was taken from online shops which sold hanbok and accessories, such as the example below from sonjjang-hanbok.com.

The binyeo I present is composed of a darkly stained and smoothed wooden stick adorned with an aventurine ring to resemble jade and tumbled garnet stones (my birthstone). The dwikkoji were created by relieving a pair of costume jewelry rings of their decorative bits and attaching those bits to hairpins which have a flat disk at the head. The dwikkoji and binyeo were utilized in the assembly of the chignon bun to help keep the layers of braids in order. In addition to the comb, non-decorative bobby pins will be used to secure the entire system over a small ponytail at the back of the head. A scrap of dark teal silk, also utilized for lining in parts of the jeogori, was wrapped around parts of the braid, both to hide construction elements and to add a bit more color.
 |
| My completed chignon with binyeo and dwikkoji. |
* * *
Norigae
Norigae is a decorative ornament which is hung from either the breast tie of a jeogori or to the waist ties of the chima. While the precursors of norigae have been found in tombs dating back to the Silla dynasty (57BC - 935), the widespread popularity of norigae can be attributed to its appeal to the aesthetic and emotional senses of women of the Joseon dynasty. Norigae were worn by women of all social classes and exhibited much variation in size and materials. At it’s most basic, a norgigae consists of an elaborately knotted silk cord which often contains some sort of ornament, and ending in a tassel of silk yarn. Ornaments could be purely decorative and include carved jade, precious stones, silver, gold, pearls and amber. Ornaments could also be functional, examples of which include a small knife, a perfume case or containers for a woman’s sewing needles.The traditional Korean art of decorative knots which is used to make norigae is called maedeup. In maedeup, a single silk cord is folded in half and each end is woven and tied to form a perfectly symmetrical series of knots. Many of the patterns created represent familiar items such as those found in nature (butterflies, dragonflies, chrysanthemums) or household items (buttons, rings), in addition to complex geometric designs. Depending on the occasion, a single norigae or norigae sets could be worn. According to the number of norigaes that make up the set, it is called a one-part (danjak), a two-part (ijak) or a three-part (samjak) norigae. Although five- and even seven-part norigaes are evidenced through artifact or photograph, samjak was generally the limit for most occassions.
 |
Three-part ornamental maedup by Eun Young Kim, knotted silk with
silver and jade adornments. Korea, 1991 - Victorian & Albert Museum |
 |
Hanbok ornament made of artificial jade and silk. 36cm
www.hanbok-boutique.com |
The norigae that I present is a danjak (one-part) norigae which features “good luck” and “button” knots made from 2.0 mm Korean knotting cord in purple and aqua. The main ornament and beads are aventurine, which was chosen to simulate the look of jade. The tassels were made of 0.42 mm silk beading thread in purple, coral and a hand-dyed teal and the tassel heads are bound with 30wt. gold silk thread. The entire norigae measures 43 cm in length, a bit on the long side for the average Korean women, but I was more concerned with replicating relative proportions than exact measurements and gave my norigae some additional length to compensate for my height.
 |
| Using a scrap of cardboard to make the tassels. |
 |
| My completed danjak norigae. |
* * *
Gomusin
Gomusin are wide, all rubber shoes with short sides and little to no heel. Molded in a single piece, the shoes are waterproof, quite useful during Korea’s long rainy season. Construction of rubber shoes began during the Japanese occupation period of the 1920s and 30s. Popular due to their affordability and ease to clean, rubber shoes remain an inexpensive alternative in footwear to this day. |
Ladies “Woon-hye” shoes. All rubber, middle 20th century.
From the online ethnographic collection, Shoes or No Shoes footwear museum, Belgium.
http://www.shoesornoshoes.com/index.php?page=collection&cat=ethno |
.jpg) |
| http://gyopo.wordpress.com/2010/07/30/intangible/ |
The choice to wear gomusin was largely a practical one. Finding a pair of gotsin (leather shoes) in my size would have required placing a pricey special order. I was lamenting this fact to a friend, who thought she might have a pair in storage that I could use as reference when modifying a pair of Western shoes to approximate the right look. I was thrilled when I realized that the all-rubber gomusin that she sent me had enough stretch that they fit. Since the shoes were slightly abused and discolored in places, I chose to neaten up the exterior with light blue acrylic nail varnish in the same shade of pale blue. This evened the color and gave the gomusin a pearly finish, dressing them up a bit. Contrast was added at the toes with bright red varnish and the pointed toe emphasized with white silk thread.
 |
| My gomusin with the materials used to decorate them. |
* * *
Beoseon (Korean traditional socks)
Beoseon is the type of sock that is worn with traditional hanbok. Historically made from silk and later cotton, the beoseon were thick and added warmth, protection and comfort to the wearing of the short-sided shoes that were favored amongst the Koreans Both men and women wore plain white beoseon, while quilted and embroidered versions were popular for children. Beseon are made of made of two identical halves with a single seam running from front to back and a characteristic upturned, pointed toe.
 |
| The beoseon that I wear were purchased from Sonjjang-Hanbok and are pictured above. |
* * *
the Completed Project
 |
| The completed project! Photo credits to Don Searle of Fantascenes Phtography. |
This was my first time competing as a Master, so I was pretty stoked with how well I did in competition. I got awards in all three categories: Best in Class for Documentation, Judges' Choice in Workmanship for Mastery of Multiple Techniques and a Presentation Award for Most Serene.
Looking back on this project six months later, those shoes are probably a lost cause. The nail enamel started cracking with wear and, although they ARE rubber, they can only stretch so much and I fear they're just too small for extended wear. I loved that chignon bun and will keep it around for other projects, but I cut my hair super short and now can't wear it. I'll have to come up with a plan B for the head and toes soon, though, as I'm looking forward to wearing the costume around at Arisia next month.
Looking back on this project six months later, those shoes are probably a lost cause. The nail enamel started cracking with wear and, although they ARE rubber, they can only stretch so much and I fear they're just too small for extended wear. I loved that chignon bun and will keep it around for other projects, but I cut my hair super short and now can't wear it. I'll have to come up with a plan B for the head and toes soon, though, as I'm looking forward to wearing the costume around at Arisia next month.
* * *
References
Eun-sun, Choe. “The Elegant Intricacy of Knotted String.” Antiques Alive. Antiques Alive Inc, 2004. Web. 23 April 2013. http://www.antiquesalive.com/masters/decorative/master05_view1.html
Kyung Ja, Lee. Norigae: Splendor of the Korean Costume. Seoul: Ewha Womans University Press, 2005. Print.
Kyung Ja, Lee, Hong Na Young and Chang Sook Hwan. Traditional Korean Costume. Kent: Global Oriental Ltd, 2003. Print.
Lenzen, J.D. Decorative Fushion Knotting. San Francisco: Green Candy Press, 2011. Print.
Magda. “Good Luck Knot Tutorial” and “Button Knot Tutorial”. How in China. Web. 12 September 2012. www.chineseknot.howinchina.com
Thorn, R. (2013, March). Traditional Korean Clothing 101. Talk presented at Nak-Kon Anime Convention, Overland Park, KS.
Yang, Sunny. Hanbok: The Art of Korean Clothing. Seoul: Hollym Corporation, 1997. Print.
* * *
Special appreciation goes out to Danielle, who not only brought back the fabric samples that spawned the interest which led to this costume, but also allowed me to turn her Korean teacher’s uniform inside-out to look at the seams, enthusiastically helped me with my Korean pronunciation, coached me through a proper Korean bow, and invited me to borrow her fan for my presentation.
This is entirely her fault.


