Showing posts with label Costume College. Show all posts

Monday, July 20, 2015

Hand Hemmed Handkerchief Instructions

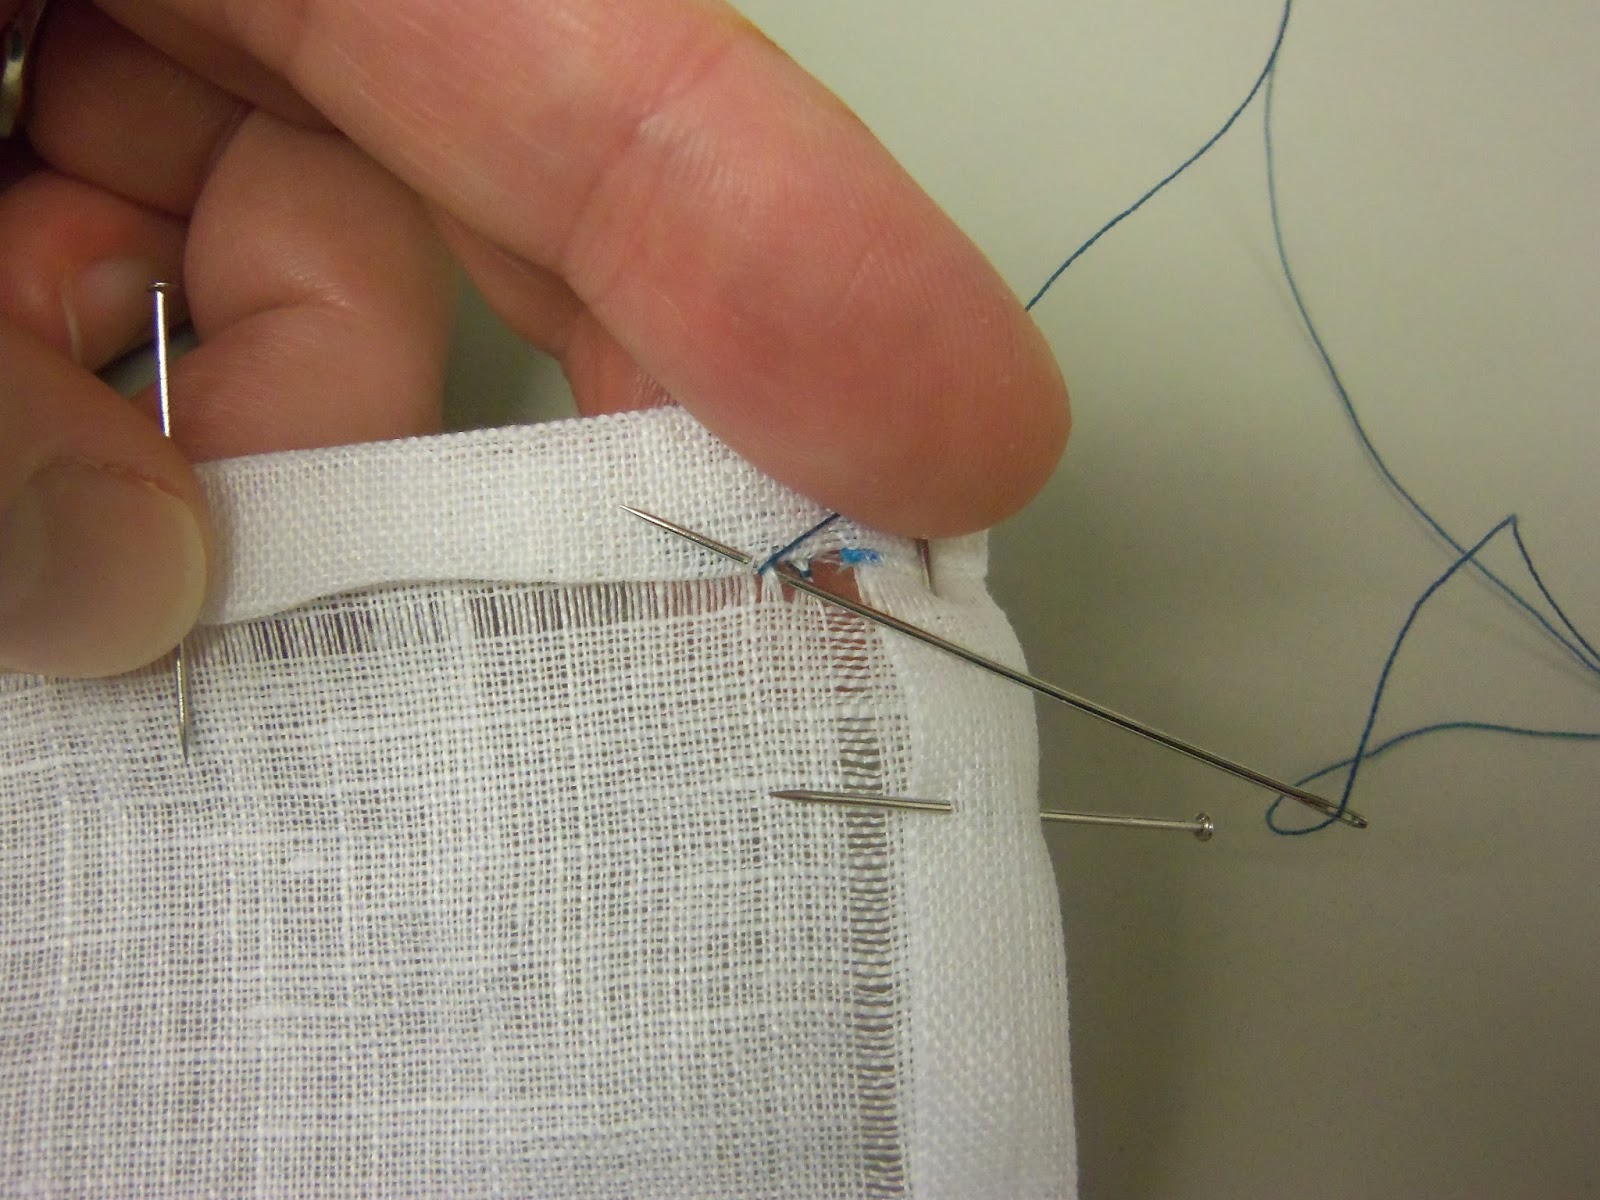
As promised, the photos to accompany my hand-hemmed handkerchief workshop that I taught at Costume College over the weekend.

'Squaring' your piece of fabric by drawing out a single thread.

Cutting along the cut line left by drawing that single thread gives you a perfectly straight line.

Measuring in one inch to draw another thread, then drawing three more threads
towards the center of your work, giving you a 'ditch' of  drawn threads.

Each edge is folded over about 1/4 inch, working around your handkerchief, then folded over again until the folded edge lines up with the outer edge of your ditch of drawn threads.  You have to work sequentially around the piece, otherwise, the raw edges won't tuck in nicely at the corners.
Gently unfold your edges and identify the outermost square out of the nine part square left in each corner.  Carefully trim this square of linen out to reduce bulk at your corners.

Refolding the hem and pining in place.  Press with the iron if necessary.

Anchor a single length of waxed thread inside the folded hem where it won't be seen.
Your thread should come out of the folded edge near the gap made by the crossed ditches.

To begin your first stitch, take the needle down through the gap, going under four threads, then coming back up. 

Gently tug the thread to the right to make a small gap between threads.

Take the needle back down through your first hole, then back up through the second, re-tracing the original path.  Only this time, when you come back up to the top side of the work, catch a thread or two of the folded edge of the hem with your needle.

Your thread has wrapped around the four threads in your ditch, pulling them into a wedge shape.
This is the end of the two parts of the hem stitch.

To begin the next stitch, take the needle down through what WAS your second gap from your first set of stitches.

The second part of the second hemstitch on this example.

Repeat your two-part stitches until you get to the end of your work or run out of thread (which will happen on larger pieces).
If you run out of thread, just anchor the end of your thread under the fold of the hem as you did in the beginning.  Then anchor a new piece of thread to continue stitching.

When you get towards the end of a row, you will be picking up a few threads from the cross-ditch instead of a folded edge.

To continue the hemstitch across the corner, use your needle like an awl to shimmy a hole four-threads wide,
by deep enough to encompass all three of the layers folded up at this point.


You may not be able to take the "down and back up" in once stitch like you've been doing thus far without the gap you've made shifting on you.  If so, just take your needle straight down and all the way through your work, then come straight up from the bottom.  It's a touch slower, but you'll only be doing this at the very end.

When you've completed your row, you can either pass your thread through the middle of the corner and begin work on your next row, or you can anchor the thread by taking 3 or four short stitches back and forth within the corner.
 
If you decide that this corner nonsense is too fiddly, don't sweat it.  You can also secure the hem on the corners with a series of neat whip stitches.  Only someone examining your work very closely would be able to tell.

It's not such a big deal on work with a narrow hem, but if you're doing something larger like a table cloth or pillow case, you can use a whip stitch  to close up the open edge at the corner.  Totally up to you.

Tuesday, June 30, 2015

CoCo Count Down

Only 29 sewing days left before I leave for Costume College.  *flails*  Aaaand, I'm stuck at work waffling about what I want to be working on, instead of at home working on it.  So I'm going to do a bit of an accountability post here to try to wrap my head around what's left to do.

Cavalcade of Costumes Exhibit:

1920s Poison Ivy: totally done
- This is one of those costumes that I can't wear myself, which is sad, because I am hella proud of how she turned out.  Since she packs small and has fiddly bits that just love to be appreciated up close, I'll hopefully be bringing Poison Ivy to go on display in the Cavalcade of Costumes exhibit, should there be space left.

Thursday Night Pool Party: Journey to Atlantis (the Booze Fairies group)

Chambord Fairy: about half done
- I've always had a problem with having a concrete plan of attack when doing a totally original project and this has been one of those projects that morphs as it goes along.  I've somehow ended up with a Wild West Steampunk sort of theme going on.  Very stylized saloon girl with the ruffly skirt and corset on the outside.  Skirt and blouse are done.  Still needs a corset to wear on the outside (something that's both reminiscent of that CHAMBORD label strip, yet also kinda steampunky.  Yeah, I know.  Don't make it easy or anything).  I also need to make some spats to wear with my boots and some sort of leather crown topper hat 'thing' since the tiara I'd originally picked out doesn't gel with the Steampunk direction the costume took.


Friday Day: hall costume

1882 Tea Gown: 95% done
- The tea gown was one of those projects that I've worn a couple of times, but not yet had any really nice photos taken in it.  Looking forward to having the opportunity to stop by the Photo Studio and get those done this year.  The dress is done, I just need to make an adjustment to the waistband of the underskirt to make it lay right over the petticoat.  Will take all of 20 minutes once I actually get around to it.  Should also figure out something to do with my hair, as it not grown out enough to do much in the way of historical styling with.


Friday Night Social: Around the World in 80 Days

Hanbok (Korean)  Totally done.  This is my Historical Masquerade entry from Costume-Con 31.
- I will find an excuse to wear this costume at least once to probably every con I'll ever go to.  Wicked comfortable and such pretty colors.  The outfit is done, but I need to pick a new pair of shoes to wear with it, as the old ones had to be tossed.  As the skirts are floor length, any nondescript pair of flats should do.  If I'm lucky, my hair might be JUST long enough to pull back into a tiny little pony tail that I can hook the bun onto.

Saturday Day: hall costume

1950s Avengers Dress: done (enough)
- Yay for comfy and fun hall costumes.  If I have time, I'd like to sort out some accessories themed after individual Avengers, but that's pretty low on the priority list.


Saturday Night Gala: Characters

Clayr from the Abhorsen series by Garth Nix: done.
- I'll admit, I've been waffling on what to wear to the Gala this year.  The big group of 18th century court gowns picked back up and is really happening this year, so I kinda wanted to participate in that.  But I wore that last year and won't have the added luggage space from the spousal unit this year and was trying to pack conservatively.  So I'm like 90% certain that I'm going to partner up with one of my costuming besties and wear the dress from her big masquerade entry at this year's Costume-Con (that I haven't posted about yet because I'm waiting for pictures better than the ones taken on our cell phones).  It's another comfy costume that packs down well, doesn't have a corset and is worn with flats.  It's a character from a book and it should be fairly easy to sit at the dinner table in it.

Sunday day: Breakfast with the Bennets

My Regency day dress is going to be entirely built around getting
to show off the bib-front smocked apron that I made last year,
when I didn't have anything to wear with it.
Total outfit progress: about 30% done.
- The nice thing about Sunday this year is that I'm not doing the afternoon Tea and won't have to negotiate a costume change between meals.  I'm teaching a workshop on handkerchief hemming that afternoon, so a downplayed Regency day gown seems about right.  I only had a Regency ballgown and I'd worn with a pair of short stays that I didn't really like the fit of. So, other than the apron, this project was essentially starting from scratch.  The aforementioned bestie helped me drape a set of full length stays when she came out for Halloween like a two years ago, so I pulled those out of the drawer and set to work.  The stays are now done except the boning and binding.  I've also made up a cap of ridiculousness to cover my hair.  I've got the petticoat from the ballgown that I can use, and the apron is done.   All that's really left to start on is the dress.  The boning is on order.  Once that arrives, I can finish up the stays and start draping on the dress.   I think I've settled on using the striped yellow cotton blend in the picture below that was acquired from the "scrap" table at Figments & Filaments.  I don't know who out there considers six yards of fabric a scrap, but I'm certainly not complaining.


bib-front Regency day dress
This dress will be long-sleeved and relatively simple.  At least minimalist on the embellishments.  And the front closure should be somewhat adjustable, limiting some of the stress from fittings.  I'll also need to make up a chemisette, but I ought to be able to bang out a simple tucker or even reuse one of the late 18th century fichus if time  becomes a constraint.  


So yeah.  Lots to do, but lots of it is little projects and finishings that I should be able to bang out relatively quickly once I set to them.  It feel better just putting it all together like this.  Now to print out a to-do list to hang above the desk with these guys and I'll be good to go.


Tuesday, June 23, 2015

Chambord Fairy: skirt

Preparations for Costume College are beginning to pick up speed.  As I was clearing out the crafting kingdom of finished pieces for Costume Con, I set out a little inspirational pile of my CoCo projects to be there to welcome me home.  The 1950s Avengers dress there at the bottom is already done, so the next step was up to the pink and gold ridiculousness in the upper left.


There's a cluster of us that are doing a twist on the Absinthe fairy, picking a new booze and a fairy style of our own choosing.  I decided to go with Chambord, mostly because I liked the sound of the flavor and was digging on the burgundy and gold color scheme.


Then plotting led to ruffles and ruffles led me to a tutorial from Tea in a Teacup about making a steampunk skirt and a cohesive theme was born: late Victorian Steampunk Chambord Fairy.  Since the skirt was the driving force behind the costume, I started with that first.  I used the suggested cutting diagram as more of a guideline.  I originally thought to use a crisp silk like tafetta, but finding the right color at a reasonable price just wasn't working out for me.  So I ended up getting the hot pink shantung pictured above for something like $11/yd and I tried my hand at dyeing it.  The fabric took up the burgundy dye beautifully, but the texture was forever changed by the super hot dye bath.  What was once shiny and crisp had been turned into something dense and of an interesting texture...

AND I LOVED IT!  I started playing with scraps and totally fell for the petal-soft fabric with the tiny cross-hatch appearance.  I was getting a Moulin Rouge can-can dancer type feeling going on, and the ruffles just made it happen.  The skirt has a raised front panel that shows off some leg, and a faux-bustled back with two extra layers of ruffles.  Rather than a boring old zip or button closure, I embraced the hardware-heavy steampunk style and put in some gold grommets for lacing.


Three tiers of ruffles in across the back.  Each row has a three and a six inch roll of ruffles, set off with a strip of gold satin piping.

The bulk of the skirt is flat-lined with brown cotton bed sheet.  I ended up cutting the narrow side panels away a bit, to give the skirt a bit more of a swept-back look.  But this mean that a bit of the brown could be seen by someone sitting.  I'm going to add some twill tape ties to the seam between side and back panels, using these to bustle the skirt a bit.  This should help that side panel to curl inwards a bit and hide the lining.  It'll also pull the back hem up just enough to keep it from trailing on the floor.  I also took a lesson from my Avengers dress on built-in petticoats and used extra sheeting to make a small built-in bustle for added umph.

I ended up doing bias-cut ruffles and giving them a rolled hem by hand.  The super-tight weave post-dye bath didn't really need finishing on the raw edges, but the fluttery fabric was so thin that I worried the ruffles would just hang limp and lifeless.  The rolled hem makes me think of the curled edges of a rose petal, and I flipped the ruffles over so that you see the 'wrong' side of them, added additional texture.  All told, the skirt has roughly 30 yards of ruffle.  I got through the entire first season of Daredevil working on that nonsense.

Next up, I need a bodice.

Tuesday, February 17, 2015

Life catching up with you

So... apparently, I haven't published anything since mid-September.  Opps.  I'd say, how did that happen, but I think I already know.  I got side-tracked from historical projects when I scrapped my initial plans for Halloween.  And then work got the way work tends to do, sometimes, with looming inspections and an unimaginable quantity of new responsibilites.  Stress means that I started spending my free time immersed in my preferred avoidance technique, reading fanfiction.  Combine that with a shiny new fandom obsession (hellooooo, Marvel Cinematic Universe.  Where have you been all my life?)  Then there was Arisia coming up and my responsibilities there were more focused on the planning of programming than the making of anything new.  So, yeah.  A creative dry spell and falling off the face of the blogosphere was bound to happen, as I always feel like I have nothing to say if I've got nothing to show.  But things have sorta kinda settled down with work a bit, and I'm ready to stop avoiding the craft room and get back to work.  So I share with you an overview of what I've been working on.

Scrapped Halloween Plans
My original idea for Halloween fit into the Alternate History challenge for the Historical Sew Fortnightly.  The spousal unit and myself were going as 'Victorian Spiders', inspired by some of the fantastical fancy dress costumes of the late Victorian era.  I already had the black underskirt, but I was able to bang out a black widow themed over-skirt and most of a brown gentleman's vest that was due to have an inverted fiddle applique on the back.  But this was the project that just stalled out on me and ended up getting shelved.  Nice part is that when I come up with another event needing something along these lines, it shouldn't take too much effort to polish them off.


Halloween 2.0: Marvel Superheroes
When the motivation to work on the Victorian spiders dried up, I decided to pursue a wild hair inspired by my current fandom obsession.  I made the Captain Marvel on the left for my bff (well, cannibalized a zentai suit and attached the mantle, hip scarf and accessorized), and my fem Captain America on the right (in which I Frankensteined a dress set out of a pair of stretch, textured tube skirts off the rack).  Wolverine in front and Star Lord in the center back completed our haphazard team.


Quilted Jumps
They were originally plotted out as an entry for the HSF challenge #16, Terminology.  Then they took a little while to get from drafted out to cutting and so got pushed back to #17, Yellow.  Then I found a funny reference in a poem while I was doing some research and they were totally going to be done in time for the challenge #18, Poetry in Motion.  But even on the machine, the quilting took FOREVER and I was like, that's it.  I know I've seen SOMEBODY do jumps in the last 18 months of HSF, I'll just write it in for inspiration and call it good.  Well, yeah.  They're still a work in progress.  I'm just about done with the binding, having left a few gaps to put in the boning that I ordered the other tnight.  So there's really very little left to do at this point.  I wanted a set of jumps to use as an alternative to stays worn under my chemise a la reine.  The yellow should be light enough to not be TOO obvious under the thin white cotton (or at least less obvious than my current gray and navy stays).


And what's coming next?

- Well, I've given myself permission to set aside the HSF challenges for now.  As much fun as they were, I was stressing myself out about getting to every single one of them and screwing myself over when it came to prioritizing projects.

- Figments & Filaments (a costuming convention here in Kansas City) is coming up and I've gotten a few panel ideas in for that.  I've not let myself be in charge of anything big, but I've found lots of little ways to get involved and hopefully make the experience a better thing for all involved.

- the deadline for getting in class proposals for Costume College came too soon after Arisia for me to be able to devote a lot of energy to them, but I was able to get one proposal in at the last minute for a workshop that would be uber fun to do, should it get selected.  Plotting for costumes for that, however, will just have to wait.  Before that is...

- Costume Con, which I had to miss last year and I was totally missing it.  Costume Con has a strong competition element to it (among a lot of other things), but as I'm one of those people that thrive on competition, it's totally my thing.  I find that having a hard deadline and knowing that someone is going to be looking at my costumes VERY closely really spurs me on.  I do more research, make my work neater and really put the extra umph into it, which results in a better finished project.  I've lucked out in that I have only one new 'from scratch' project in mind for this year, and that was being an extra in someone else's big group project, so I don't really have to do the stressful plotting and planning for it.  Just make a dress and show up for rehearsals, which is oddly relaxing.  I have a couple of pieces that were long languishing works in progress that I've brought out to finish up for this.  And a finished costume that totally fits a theme.  And my historical masquerade entry was 'finished enough to wear' but totally needs more work and the collation of all of my documentation.

So I've got enough to be getting on with, me thinks.  Mostly I wanted to get all of this down to swing myself back into this blogging thing.  As I wrap projects up, hopefully I'll remember to do the show-and-tell part that should come after them.


Wednesday, September 17, 2014

Costume College 2014: Studio Pictures

I'm going to start by saying that the photo studio set up for Costume College is perhaps the most brilliant I have ever seen.  For those of you unfamiliar with it, the convention arranges for a professional photographer to come in and set up their area.  Attendees can then purchase a pass in the form of a badge ribbon for $1.  That pass allows them to come to the studio as often as they like, getting professional shots documenting all of their costumes (excepting those worn on Thursday night, before the con properly gets underway).  Then you go to the photographer's website to view the proofs of yourself and everyone else who visited the studio, purchasing what you'd like a copy of.  The "low res" copies cost just $2 each.  Being one of those people who isn't too great at getting around to getting nice pictures taken of me at con, this set up was brilliant.  Meaning I now have great documentation of all of my costumes in excellent lighting, while I was dressed up with the hair and makeup and all the accessories.

So now, a PROPER summary of what I wore to Costume College:

Thursday night Tiki Pool Party
Hibiscus kimono and hand-painted haori jacket
(not from the studio, but I wanted a complete lineup)
Friday Night "Club Ice" Ice Cream Social
1920s Mr Freeze

Victoria and I had the same idea on Saturday morning; we both showed up wearing white neckerchiefs over hair that was half-done up for the Gala that night.  The fact that we also ended up in green tops and jeans was just too funny not to document.

Saturday morning: oh crap I have a class to get to and my hair is only half-done!

Saturday Night's Gala
18th century court ensemble


Sunday Morning Breakfast
18th century short gown w/ cotton petticoat and whitework embroidery apron

Sunday Afternoon Tea: Ladies' Day at the Ascot
18th c Chemise a la Reine


Ah.  And NOW I'm finally done posting about Costume College, at least until we start plotting for next year.