Showing posts with label embroidery. Show all posts

Monday, July 20, 2015

Hand Hemmed Handkerchief Instructions

As promised, the photos to accompany my hand-hemmed handkerchief workshop that I taught at Costume College over the weekend.

'Squaring' your piece of fabric by drawing out a single thread.

Cutting along the cut line left by drawing that single thread gives you a perfectly straight line.

Measuring in one inch to draw another thread, then drawing three more threads
towards the center of your work, giving you a 'ditch' of  drawn threads.

Each edge is folded over about 1/4 inch, working around your handkerchief, then folded over again until the folded edge lines up with the outer edge of your ditch of drawn threads.  You have to work sequentially around the piece, otherwise, the raw edges won't tuck in nicely at the corners.
Gently unfold your edges and identify the outermost square out of the nine part square left in each corner.  Carefully trim this square of linen out to reduce bulk at your corners.

Refolding the hem and pining in place.  Press with the iron if necessary.

Anchor a single length of waxed thread inside the folded hem where it won't be seen.
Your thread should come out of the folded edge near the gap made by the crossed ditches.

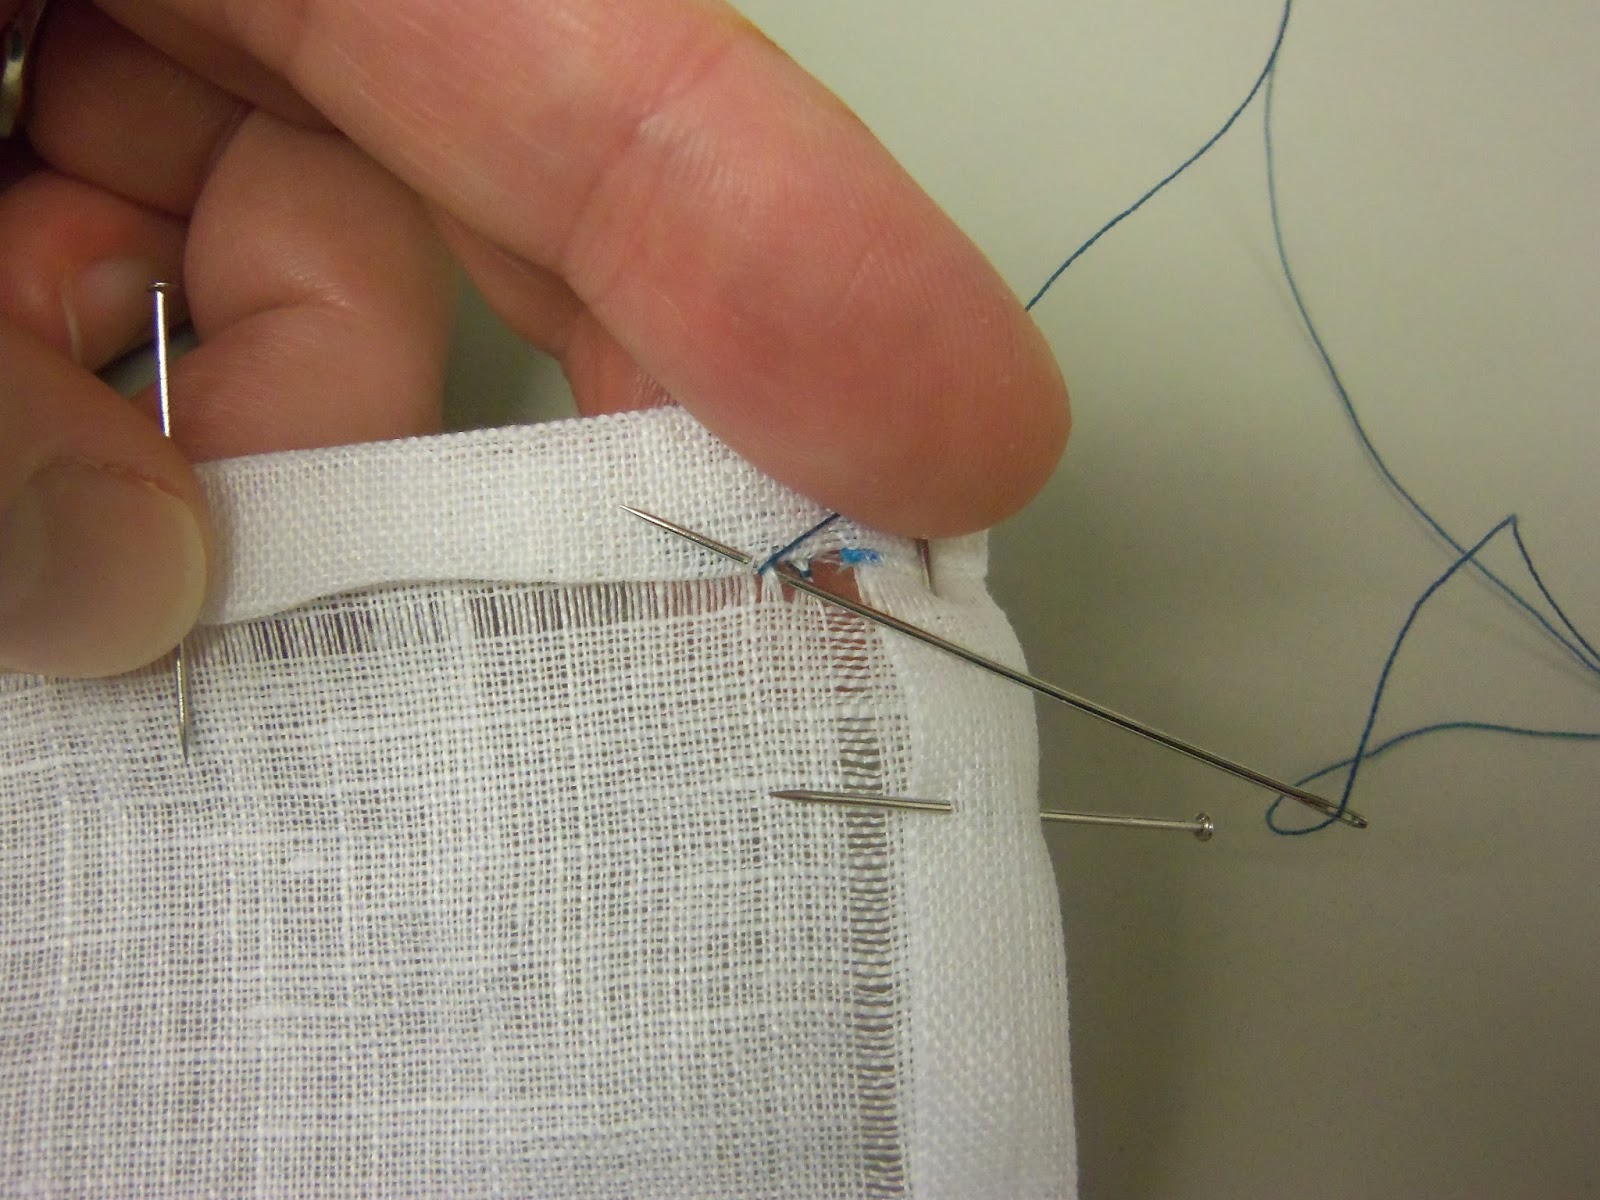
To begin your first stitch, take the needle down through the gap, going under four threads, then coming back up. 

Gently tug the thread to the right to make a small gap between threads.

Take the needle back down through your first hole, then back up through the second, re-tracing the original path.  Only this time, when you come back up to the top side of the work, catch a thread or two of the folded edge of the hem with your needle.

Your thread has wrapped around the four threads in your ditch, pulling them into a wedge shape.
This is the end of the two parts of the hem stitch.

To begin the next stitch, take the needle down through what WAS your second gap from your first set of stitches.

The second part of the second hemstitch on this example.

Repeat your two-part stitches until you get to the end of your work or run out of thread (which will happen on larger pieces).
If you run out of thread, just anchor the end of your thread under the fold of the hem as you did in the beginning.  Then anchor a new piece of thread to continue stitching.

When you get towards the end of a row, you will be picking up a few threads from the cross-ditch instead of a folded edge.

To continue the hemstitch across the corner, use your needle like an awl to shimmy a hole four-threads wide,
by deep enough to encompass all three of the layers folded up at this point.


You may not be able to take the "down and back up" in once stitch like you've been doing thus far without the gap you've made shifting on you.  If so, just take your needle straight down and all the way through your work, then come straight up from the bottom.  It's a touch slower, but you'll only be doing this at the very end.

When you've completed your row, you can either pass your thread through the middle of the corner and begin work on your next row, or you can anchor the thread by taking 3 or four short stitches back and forth within the corner.
 
If you decide that this corner nonsense is too fiddly, don't sweat it.  You can also secure the hem on the corners with a series of neat whip stitches.  Only someone examining your work very closely would be able to tell.

It's not such a big deal on work with a narrow hem, but if you're doing something larger like a table cloth or pillow case, you can use a whip stitch  to close up the open edge at the corner.  Totally up to you.

Thursday, April 2, 2015

HSM April: War & Peace - the 14th Century Linen Coif

April's Historical Sew Monthly Challenge was War & Peace: The extremes of conflict and long periods of peacetime both influence what people wear.  Make something that shows the effects of war, or of extended peace.  

After getting dressed up for pictures in my new side-less surcoat, I was reminded that, while I love having the veil, I hate the work it takes to get it on right.  I had been wearing my veil pinned to a matching silk fillet (strap around the head) and barbette (strap under the chin), but the process of pinning those pieces in place, then pining the veil to them had grown cumbersome.  I was looking for something both more secure, and requiring less fiddling to get and keep on straight.  Hence the coif!

There are any number of excellent patterns and instructions out there, but the one that I found most useful was posted by the Maniacal Medievalist, which used lots of measurements and math to get something close-fitting and properly fit.  I made slight alterations to the pattern in that edge against the face is bound in the same narrow strip of fabric that extends down into the ties, rather than having a turned under edge with separate ties attached.  I felt that this made my ties more secure, but had the drawback of leaving me with short ties, due to the size of the scrap of linen that I was using.  As much as having things secured under the chin tend to annoy me, I'm thinking I may just leave the ties undone, or tie them instead behind the neck.  Either way, the cap stays relatively secure.

I left a bit of ease in the back so I'd have a place to stuff my hair, if I succeed in growing it out.


Octopus made a fantastically patient model for me while I kept fiddling with camera settings.


Seen from the back.  Lower edge was turned under twice and whip stitched.

Once the cap was complete, I tried it on and was a bit disappointed in the center seam.  The two pieces were sewn together, then the seam allowances folded back under themselves and secured to their respective halves. I was a touch unsure about the security of the seam, and so decided to do some sort of decorative top-stiching to secure it.  Well that went downhill and I ended up doing a more elaborate layered herringbone design reminiscent of some of the St Birgitta's caps I'd come across in my research.

Detail of the herringbone stitching down the center seam.
The details for the challenge

What the item is (and how it is a product of war or a lengthy period of peace: Medieval linen coif.  I kind of see the entire medieval period as an unsteady period of war and peace, and war again.  However, 600 years in the future, historians could probably say the same of today.

Fabric: lightweight white linen
Pattern: here
Year: 14th century
Notions: linen thread, bamboo viscose crochet thread for the embroidery
How historically accurate is it? 9.5/10, with a half-point docked for the embroidery thread
Hours to complete: about 8, starting from measuring and drafting out the pattern.  About half of that was spent on the embroidery.
First worn: Planning to wear it for Figments & Filaments later this month
Total cost: maybe $2.  All of the materials were in the stash and really only a very small bit of them had to be used.


Saturday, February 1, 2014

Project Summary: 1920s Poison Ivy

The first costume I want to talk about from our group of Batman villains is Poison Ivy.  This was by far my favorite character of all that I worked on.  I love this color and I love this character.  Poison Ivy is a villain who wields her sexuality as a weapon.  It was a super easy choice to assign that character to my bff, V, as it is my personal goal in this life to find her costumes that show off her super long legs.

The theme for our group was 1920s reinterpretations of the characters as they were presented in the Batman movies that came out while I was growing up.  Poison Ivy was featured in Batman and Robin (1997) and was played by Uma Thurman.  

Even though her cape here appears to be a burnout velvet, I really loved the light, fluttery hem of it.
It was this hemline that helped me chose how I wanted to realize this costume.


I loved how this character was done up in such a way as to take advantage of the long, lean lines.  She wasn't super busty or showing a lot of skin.  To capture her look, I went with a long, dropped waist dress with a handkerchief hem, which reminded me of the hemline on her cloak.  I started with the following pattern:

Folkwear #264: the Monte Carlo Dress

 For period inspiration, I found this little vintage number for sale on Etsy.

I used a silk chiffon, and flat lined the bodice with silk habotai, both of which were dyed emerald green.  The only adjustment to the pattern was to change the way the straps were put together.  The bodice is covered in tiny little o-shaped arrangements of gold seed beads and the neckline was outlined in alternating seed and bugle beads.  There is also one narrow sash of beading and embroidery that hangs down from the right hip.  I dyed up a scrap of silk velvet in a darker green, and used it to make ivy leaf appliques with couched gold silk beading thread for veins.  These were placed on the left shoulder and right hip.  The idea was to be balanced, without being symmetrical.  Litlle dangly bits of beading hang from the appliques on the shoulder.  


I also cut out an 8x80" strip of chiffon with angled ends for a scarf.  I didn't want to try to pair a lot of jewelry with this dress, as I thought the beading was rather taking care of the bling factor for us.  But her neck just looked too naked without something there.

For the hand bag, I just sketched out a rectangle on a piece of habotai that I dyed gold, then machine basted it to a piece of interfacing and stuck it in an embroidery hoop.  The pattern I just made up after looking at too many art deco designs.  I sketched on four horizontal lines and had V start beading them.  The rest just sort of developed as we went along.


The gloves were white nylon gloves bought from the party shop.  Everything on the internet said that nylon dyes up just like silk, and they were right!  We set V up in a pair of latex gloves to protect her skin, then put the nylon gloves over them and started painting.  The idea was to replicate the purple and red fingers on the characters leather gloves in the movie.


The shoes were simple enough.  A pre-owned and well worn pair of strappy heels were given a new life with a coat of gold leaf.  Simple, yet elegant.  Her hair pin was salvaged from this retro iron work peacock thing that my mom has hanging on her wall.  The thing had this blingy rhinestone bit stuck to the top of it's head, and she hated how out of place it looked.  It had obviously fallen off and been hot glue back on (poorly), so I spent a fair bit of time picking glue out of the settings before soaking it in vinegar and baking soda, then giving all of the metal parts a touch up with gold leaf, as well.


Woo, look at that hemline.  I think that's my single favorite part of this dress.
Eight sided skirt, with round about 8 yards of hem, all hand stitched rolled hem.

On stage, with the Joker.