Monday, July 20, 2015

Hand Hemmed Handkerchief Instructions

As promised, the photos to accompany my hand-hemmed handkerchief workshop that I taught at Costume College over the weekend.

'Squaring' your piece of fabric by drawing out a single thread.

Cutting along the cut line left by drawing that single thread gives you a perfectly straight line.

Measuring in one inch to draw another thread, then drawing three more threads
towards the center of your work, giving you a 'ditch' of  drawn threads.

Each edge is folded over about 1/4 inch, working around your handkerchief, then folded over again until the folded edge lines up with the outer edge of your ditch of drawn threads.  You have to work sequentially around the piece, otherwise, the raw edges won't tuck in nicely at the corners.
Gently unfold your edges and identify the outermost square out of the nine part square left in each corner.  Carefully trim this square of linen out to reduce bulk at your corners.

Refolding the hem and pining in place.  Press with the iron if necessary.

Anchor a single length of waxed thread inside the folded hem where it won't be seen.
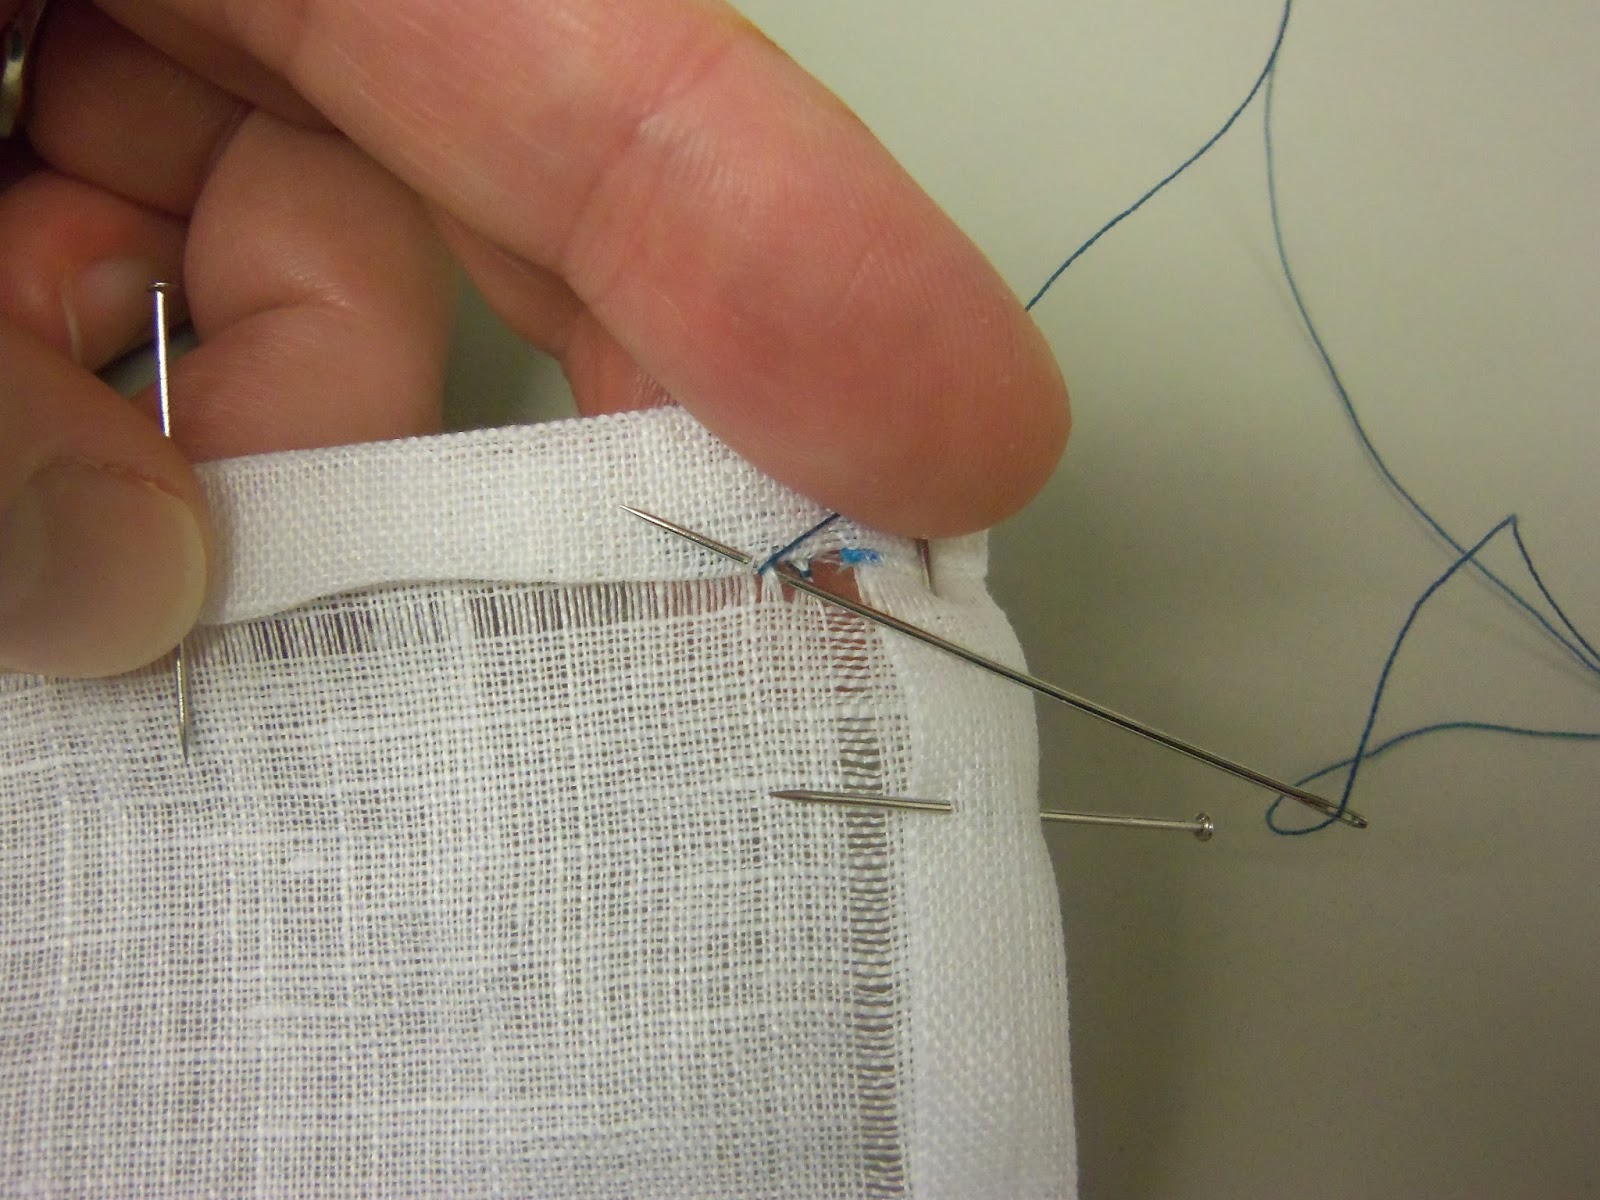
Your thread should come out of the folded edge near the gap made by the crossed ditches.

To begin your first stitch, take the needle down through the gap, going under four threads, then coming back up. 

Gently tug the thread to the right to make a small gap between threads.

Take the needle back down through your first hole, then back up through the second, re-tracing the original path.  Only this time, when you come back up to the top side of the work, catch a thread or two of the folded edge of the hem with your needle.

Your thread has wrapped around the four threads in your ditch, pulling them into a wedge shape.
This is the end of the two parts of the hem stitch.

To begin the next stitch, take the needle down through what WAS your second gap from your first set of stitches.

The second part of the second hemstitch on this example.

Repeat your two-part stitches until you get to the end of your work or run out of thread (which will happen on larger pieces).
If you run out of thread, just anchor the end of your thread under the fold of the hem as you did in the beginning.  Then anchor a new piece of thread to continue stitching.

When you get towards the end of a row, you will be picking up a few threads from the cross-ditch instead of a folded edge.

To continue the hemstitch across the corner, use your needle like an awl to shimmy a hole four-threads wide,
by deep enough to encompass all three of the layers folded up at this point.


You may not be able to take the "down and back up" in once stitch like you've been doing thus far without the gap you've made shifting on you.  If so, just take your needle straight down and all the way through your work, then come straight up from the bottom.  It's a touch slower, but you'll only be doing this at the very end.

When you've completed your row, you can either pass your thread through the middle of the corner and begin work on your next row, or you can anchor the thread by taking 3 or four short stitches back and forth within the corner.
 
If you decide that this corner nonsense is too fiddly, don't sweat it.  You can also secure the hem on the corners with a series of neat whip stitches.  Only someone examining your work very closely would be able to tell.

It's not such a big deal on work with a narrow hem, but if you're doing something larger like a table cloth or pillow case, you can use a whip stitch  to close up the open edge at the corner.  Totally up to you.

Monday, July 13, 2015

A quick-n-easy way to store pre-cut corset boning is... not what I'm supposed to be working on right now.

Getting ready for a big costuming con is always a maddening thing.  It seems like the to do list gets more things added to it than get crossed off.  And my attention flits from one project to another so often that I feel like I'm always working, and yet never getting anything all the way done.  Plus, I never get around to taking the time to take any good pictures, so even the stuff I'm getting done doesn't get shown off.  I suppose that when I'm quiet around here is probably when I'm getting the most things done.  I just can't seem to share any of it until after the con has come and gone.

The Sunday breakfast at Costume College has a Regency theme this year, and my only Regency piece was a ballgown.  So, something new had to be made.  And with the ballgown I wore a pair of wholly inadequate short stays, so new stays were on the docket.  And a new chemise.  And perhaps a day cap.  Ok, so I was building an entirely new outfit from scratch.  My sanity is clearly in question.  Here, have some ridiculous fitting pics to giggle at.  The chemise is straightforward, and the cap is exactly as ridiculous as I intended.  Once I get a nice, clear photo of it, I'll put it up on the Historical Sew Fortnightly group for the Accessories challenge.


Collapsing bust cups.  Not groovy, yo.  I went back and put some corded channels over the bust to give a bit of added shape, then put in an additional boning channel.  Not extending over the hips made the stays super comfortable and way easier to fit.  Back looks good, except for the boning is too long going into the straps.  I either need shorter boning, or I need to learn to hold my shoulders back, because when I pull them back, it looks fine.  An extra snug bodice on the dress might aid me in that respect, but I might try to shorten the bones, anyway.


Anywho, so of course, my brain decides to take a little detour on a a quick-and-easy side project that: fit an immediate need, used up a bit of stash and was started and a finished in a matter of hours, making me feel like I'm at least accomplishing something.  While trying to figure out what boning lengths I had and what I needed to order, my frustration level with my current mode of storage for corseting bits reach critical mass.

Seemed like a good idea at the time, but hella hard to dig out the lengths I'm looking for.


The concept came from the ideas for rolled up storage of knitting needles and crochet hooks that I've come across over time.  There are no pictures of the pieces, but it's pretty straight forward.  Cut two rectangles of the cotton canvas left over from the stays project; wide enough for one inch per number of differing lengths of boning I'm likely to have on hand and tall enough to accommodate my longest bones, plus a few inches for seams and wiggle room.  Lay the two pieces on top of each other.  For the top piece, cut it in half at an angle, on a line drawn between marks 2 inches shorter than the shortest and longest bones.


Bind the angle cut side of the 'top' piece with bias tape from the Grandma stash.  Lay canvas pieces together and sew 1 inch channels through both pieces.  Lift the needle and skip over the top of the channels, but go ahead ans sew across the bottoms.  They're going to get bound, anyway.  Cut the loose threads at the top of the channels on the right side of the project, but...

Leave the threads on the back of the project in place to prevent unraveling.

Sewing across the bottom of the channels, within the 1/2" seam allowance of the binding.


Lay the two layers of cotton on top of a fashionable outer fabric and sew
together with binding around all four sides

Add a ribbon to one edge for securely tying the rolled case.

And the genius moment, use up the leftover bits of bias tape by making a loop for hanging and...

Viola!  Store hanging up to keep boning from sliding out and free up space in the drawer.


You like that striped yellow cotton?  Me too.  I picked it up from the Scrap Swap at Figments & Filaments this year.  The other 5 3/4 yards of it is getting made into the Regency day dress that goes with the foundations pictured above.  I like how the projects pair up like that.  Makes me smile.


Tuesday, June 30, 2015

CoCo Count Down

Only 29 sewing days left before I leave for Costume College.  *flails*  Aaaand, I'm stuck at work waffling about what I want to be working on, instead of at home working on it.  So I'm going to do a bit of an accountability post here to try to wrap my head around what's left to do.

Cavalcade of Costumes Exhibit:

1920s Poison Ivy: totally done
- This is one of those costumes that I can't wear myself, which is sad, because I am hella proud of how she turned out.  Since she packs small and has fiddly bits that just love to be appreciated up close, I'll hopefully be bringing Poison Ivy to go on display in the Cavalcade of Costumes exhibit, should there be space left.

Thursday Night Pool Party: Journey to Atlantis (the Booze Fairies group)

Chambord Fairy: about half done
- I've always had a problem with having a concrete plan of attack when doing a totally original project and this has been one of those projects that morphs as it goes along.  I've somehow ended up with a Wild West Steampunk sort of theme going on.  Very stylized saloon girl with the ruffly skirt and corset on the outside.  Skirt and blouse are done.  Still needs a corset to wear on the outside (something that's both reminiscent of that CHAMBORD label strip, yet also kinda steampunky.  Yeah, I know.  Don't make it easy or anything).  I also need to make some spats to wear with my boots and some sort of leather crown topper hat 'thing' since the tiara I'd originally picked out doesn't gel with the Steampunk direction the costume took.


Friday Day: hall costume

1882 Tea Gown: 95% done
- The tea gown was one of those projects that I've worn a couple of times, but not yet had any really nice photos taken in it.  Looking forward to having the opportunity to stop by the Photo Studio and get those done this year.  The dress is done, I just need to make an adjustment to the waistband of the underskirt to make it lay right over the petticoat.  Will take all of 20 minutes once I actually get around to it.  Should also figure out something to do with my hair, as it not grown out enough to do much in the way of historical styling with.


Friday Night Social: Around the World in 80 Days

Hanbok (Korean)  Totally done.  This is my Historical Masquerade entry from Costume-Con 31.
- I will find an excuse to wear this costume at least once to probably every con I'll ever go to.  Wicked comfortable and such pretty colors.  The outfit is done, but I need to pick a new pair of shoes to wear with it, as the old ones had to be tossed.  As the skirts are floor length, any nondescript pair of flats should do.  If I'm lucky, my hair might be JUST long enough to pull back into a tiny little pony tail that I can hook the bun onto.

Saturday Day: hall costume

1950s Avengers Dress: done (enough)
- Yay for comfy and fun hall costumes.  If I have time, I'd like to sort out some accessories themed after individual Avengers, but that's pretty low on the priority list.


Saturday Night Gala: Characters

Clayr from the Abhorsen series by Garth Nix: done.
- I'll admit, I've been waffling on what to wear to the Gala this year.  The big group of 18th century court gowns picked back up and is really happening this year, so I kinda wanted to participate in that.  But I wore that last year and won't have the added luggage space from the spousal unit this year and was trying to pack conservatively.  So I'm like 90% certain that I'm going to partner up with one of my costuming besties and wear the dress from her big masquerade entry at this year's Costume-Con (that I haven't posted about yet because I'm waiting for pictures better than the ones taken on our cell phones).  It's another comfy costume that packs down well, doesn't have a corset and is worn with flats.  It's a character from a book and it should be fairly easy to sit at the dinner table in it.

Sunday day: Breakfast with the Bennets

My Regency day dress is going to be entirely built around getting
to show off the bib-front smocked apron that I made last year,
when I didn't have anything to wear with it.
Total outfit progress: about 30% done.
- The nice thing about Sunday this year is that I'm not doing the afternoon Tea and won't have to negotiate a costume change between meals.  I'm teaching a workshop on handkerchief hemming that afternoon, so a downplayed Regency day gown seems about right.  I only had a Regency ballgown and I'd worn with a pair of short stays that I didn't really like the fit of. So, other than the apron, this project was essentially starting from scratch.  The aforementioned bestie helped me drape a set of full length stays when she came out for Halloween like a two years ago, so I pulled those out of the drawer and set to work.  The stays are now done except the boning and binding.  I've also made up a cap of ridiculousness to cover my hair.  I've got the petticoat from the ballgown that I can use, and the apron is done.   All that's really left to start on is the dress.  The boning is on order.  Once that arrives, I can finish up the stays and start draping on the dress.   I think I've settled on using the striped yellow cotton blend in the picture below that was acquired from the "scrap" table at Figments & Filaments.  I don't know who out there considers six yards of fabric a scrap, but I'm certainly not complaining.


bib-front Regency day dress
This dress will be long-sleeved and relatively simple.  At least minimalist on the embellishments.  And the front closure should be somewhat adjustable, limiting some of the stress from fittings.  I'll also need to make up a chemisette, but I ought to be able to bang out a simple tucker or even reuse one of the late 18th century fichus if time  becomes a constraint.  


So yeah.  Lots to do, but lots of it is little projects and finishings that I should be able to bang out relatively quickly once I set to them.  It feel better just putting it all together like this.  Now to print out a to-do list to hang above the desk with these guys and I'll be good to go.


Tuesday, June 23, 2015

Chambord Fairy: skirt

Preparations for Costume College are beginning to pick up speed.  As I was clearing out the crafting kingdom of finished pieces for Costume Con, I set out a little inspirational pile of my CoCo projects to be there to welcome me home.  The 1950s Avengers dress there at the bottom is already done, so the next step was up to the pink and gold ridiculousness in the upper left.


There's a cluster of us that are doing a twist on the Absinthe fairy, picking a new booze and a fairy style of our own choosing.  I decided to go with Chambord, mostly because I liked the sound of the flavor and was digging on the burgundy and gold color scheme.


Then plotting led to ruffles and ruffles led me to a tutorial from Tea in a Teacup about making a steampunk skirt and a cohesive theme was born: late Victorian Steampunk Chambord Fairy.  Since the skirt was the driving force behind the costume, I started with that first.  I used the suggested cutting diagram as more of a guideline.  I originally thought to use a crisp silk like tafetta, but finding the right color at a reasonable price just wasn't working out for me.  So I ended up getting the hot pink shantung pictured above for something like $11/yd and I tried my hand at dyeing it.  The fabric took up the burgundy dye beautifully, but the texture was forever changed by the super hot dye bath.  What was once shiny and crisp had been turned into something dense and of an interesting texture...

AND I LOVED IT!  I started playing with scraps and totally fell for the petal-soft fabric with the tiny cross-hatch appearance.  I was getting a Moulin Rouge can-can dancer type feeling going on, and the ruffles just made it happen.  The skirt has a raised front panel that shows off some leg, and a faux-bustled back with two extra layers of ruffles.  Rather than a boring old zip or button closure, I embraced the hardware-heavy steampunk style and put in some gold grommets for lacing.


Three tiers of ruffles in across the back.  Each row has a three and a six inch roll of ruffles, set off with a strip of gold satin piping.

The bulk of the skirt is flat-lined with brown cotton bed sheet.  I ended up cutting the narrow side panels away a bit, to give the skirt a bit more of a swept-back look.  But this mean that a bit of the brown could be seen by someone sitting.  I'm going to add some twill tape ties to the seam between side and back panels, using these to bustle the skirt a bit.  This should help that side panel to curl inwards a bit and hide the lining.  It'll also pull the back hem up just enough to keep it from trailing on the floor.  I also took a lesson from my Avengers dress on built-in petticoats and used extra sheeting to make a small built-in bustle for added umph.

I ended up doing bias-cut ruffles and giving them a rolled hem by hand.  The super-tight weave post-dye bath didn't really need finishing on the raw edges, but the fluttery fabric was so thin that I worried the ruffles would just hang limp and lifeless.  The rolled hem makes me think of the curled edges of a rose petal, and I flipped the ruffles over so that you see the 'wrong' side of them, added additional texture.  All told, the skirt has roughly 30 yards of ruffle.  I got through the entire first season of Daredevil working on that nonsense.

Next up, I need a bodice.

1950s Avengers Dress

I came home from Costume Con and indulged in a quickie sewing project. Well, quick was a bit of a relative term, but when compared to months-long historical recreations, a few days is nothing. Now, I'm just a teensy bit of an Avengers fan. I had been keeping an eye on some of the themed cotton prints at JoAnn's for a while now, but it wasn't until I spotted this gem that inspiration struck. they finally came up with a print that included Black Widow and Hawkeye along side the other more commonly represented crew. Cue the flailing.
Marvel Avengers Assemble Grid Cotton Fabric

In order to take advantage of the large characters on this, I needed a dress that had a lot of acreage that wasn't frequently interrupted by seams. This McCall's 50s retro wrap dress seemed to fit the need:


Only three pattern pieces, darted in front and back, with back waist and shoulder seams.
Back wraps around to the front for a sheath-and-overskirt look. A: has contrast back and skirt.
Bias tape finishes edges.  Large pieces of fabric with darts for fitting that would be largely
covered in the front by the wrap-around "belt" portion.

A bit of googling shows that it was once Butterick's most popular pattern, but among the modern sewers, the dress is getting a lot of hate. I read everything that I could, especially the details on just what people were hating about it. Poor fit throughout the bodice, insecure fastenings, gaping under the arm, heavy skirts draging the dress off kilter with wear, and so on and so forth. Wow. For once being so popular, people sure did hate this dress. But then I lucked upon a tutorial for re-fitting the dress. It turns out that the pattern was re-drafted when being made up for a modern release, loosing a lot of the fit that made the dress so awesome. Katrina over at Edelweiss Patterns Blog wrote up a comprehensive set of instructions that made huge improvements in the way the dress fits.


This was another one of those patterns that, once drawn out, I kinda of started to ignore the cutting construction details. For starters, I had to get creative with the piecing since I was working with a narrow (45") width fabric. Blue lines show where I extended pieces out for better coverage/security/up-sizing.  Red lines are where I either added additional darts or broke pattern pieces down to be able to cut them from a narrow fabric.  Since the bulk of the front panel gets hidden under the skirts, I wasn't worried about the extra seams.

A nice thing about this print is that no matter which orientation you have the fabric in, somebody is upright.  The dominant image to my eye was the Hulk and I wanted to keep him upright on the bodice and skirt fronts.  This left Black Widow and Hawkeye the upright characters on the skirt back.  Of course, Hawkeye falling to the earth while shooting an arrow straight up might actually be upright, so it's hard to tell.

I flat-lined the front and bodice back with the  Sew Classics Bottomweight Wrinklease in white.  This gave a nice foundation for the bodice pieces, while also ensuring opacity.  I added a few inches to the center front pieces so the finished dress doesn't have quite the open space in the front, which I think that I like.  I wasn't a fan of where the skirt fronts flip back, so the three inches or so of the center front is faced, which serves two purposes. One, the reverse of the fabric is quite obvious and a bit unsightly. Two, I used the same cotton bottom weight as the flat-lining, which added a bit of weight to keep the skirt fronts from flying open.  I also swapped out the button-and-loop closure recommended in the pattern for a set of shoestring ties that wrap back around to the front.  Being able to tighten the under layer means that stress is not put on the closer of the outer layer, so that it lays nicely and doesn't bunch.

Another issue with the dress is that you can't really wear the standard petticoat under this, since the dress is open in the front, and the front bodice piece does not flare out from the waist. And this dress NEEDS a petticoat.  You can't achieve that classic 50's silhouette without one.  Katrina's sew-a-long tutorial had instructions for making a petticoat that separates in the front so that it could be tucked under the overskirt, but I worried that it'd work it's way forward and show. So instead, I chose to build the petticoat into the dress. I cut a second overskirt piece out of my white cotton bottomweight that was a couple inches shorter in length, and did not have the added inches to the center front. The hem was finished with some vintage bias tape and sewn down with several rows of straight stitching in a trapunto style to add a bit of stiffness.  I sandwiched the bottom edge of the upper back piece in between the two layers of skirt, then surged the seam allowance which would then be hidden when the skirt layers hang down. The built-in petticoat is nice because I don't have to worry about tracking down extra pieces, but the cotton did add a bit of weight.  I don't notice it when I'm wearing the dress, but my hanger wasn't happy and I'll have to keep that in mind when packing for travel.

The dress opened up to show the facings on the overskirt, as well as the added petticoat layer.
The front has 3 hook-n-eye closures, but I stitched down a couple of Avengers logo pins in place of buttons.


The back of the skirts ride up just a bit.  I think that the next time I make up this pattern, I need to add more length to the skirt back, taking a bit of it out of the bodice back.  I like the built-in petticoat, but I think I'll look for a light-weight tulle and keep the dress hand-wash only.  And even though I added more coverage to the armhole, it still falls a bit short in the front.  Easy enough to fix with a neutral colored tank top for now, but I'll have to tweak that for next time.  Because OF COURSE there's going to be a next time.  The dress is comfy and fun to wear, while still dressing it up quite a bit compared to my usual slovenly fashions of knit tees and cargo pants.  I'm actually already plotting another. This time, a fancy party frock. I've got three yards of this synthetic plum taffeta with black flocked floral designs on it that's been languishing in the stash for eons. It's not enough to make a full dress out of, but if I pair that up with a plain black taffeta and do something along the lines of View A, only cutting the upper back piece out of solid black and leave it so that only the over skirt is the decorative bit, it ought to look pretty sharp.  Holiday party dress?


Thursday, May 7, 2015

Figments & Filaments 2015


Last weekend I attended the sophomore year of Figments & Filaments here in Kansas City (Overland Park, if you want to get specific).  It's exciting to have a costuming convention starting up in my own town.  And there was SO much awesome packed into such a small con.

I got to go to a great panel about the 14th C V-neck gown (houppelande) by Robin Netherton.  She had many thinky thoughts on the evolution of the neckline and the construction there of.  It left me wanting to make another go at making a houppelande, and possibly not out of heavy upholstery fabric this time.  I also hit a panel on the use of silk and gold in Medieval textiles by Gale Owen Crocker that left me wanting to embroider everything in gold.  A panel on leather working got the inspiration running and lead me make an inaugural visit to Tandy Leather for basic supplies.  I also caught Jillian Venters catch-all panel on Goth Style which left me wanting to tweak and mod my way into something fabulous.  I also hosted a panel on 18th C Womens' Fashions, focusing on the social and political climate that they were a part of.  Wow, but it's been a while since I've had to do such concentrated prep work for something.  It was like college all over again.  But on the bright side, I now have a rough draft of a good programming topic put together that I can refine before bringing out another time.  Not that spending hours collecting images of portraits and extant garments wasn't a fabulous use of my time.  And I solidified a lot of things that I kinda knew, but didn't know well.  Especially with regards to the timeline of events in the French and English courts and the people involved.

Pretty much everything else that I got up to can be summarized in photos.  Luckily, the official con photographers and the couple of others that were flitting around were great about catching lots of photos of everyone and I got caught at one point or another in every costume that I wore. 

I put the His & Hers 18th C Court Ensemble in the costume gallery.
Photo by BMoon Studios
I finally caught a few photos of me wearing my 1880s tea gown.
Photo by Tom Ulrick
Obligatory cup of tea with the tea gown.
Photo by BMoon Studios
As a guest lecturer, I scored an unexpected invite to the VIP meet-n-greet on opening night.
Photo by BMoon Studios.  
I overslept and missed the opportunity to wear my chemise dress to my 18th c fashion panel,
but it made a great outfit for lounging about on Saturday afternoon.
Photo by BMoon Studios.


Finishing my white work embroidery project started back at Costume College last year.
Photo by Tom Ulrick.

Aaaaand, I got to have a right and proper geek-gasm getting my photo taken with the lovely gentleman from
Iron Brothers of Topeka.  I've admired their suits from afar at other, more crowded events.  So it was a real
treat to get to check them out in a much more subdued venue.  Photo by IBOT.
Stephanie caught a photo of me in the Queen of Hearts costume that I wore for the fashion show.
The look was well-received, but I creep myself out whenever I see pictures of that makeup job.
The goal was to minimize the pretty and over-emphasize masculine mouth and jawline.  *shivers*

And here I am with Kimberly, scaring off new friends just as fast as I can make them.
Photo stolen from Stephanie.

It was SO hard staying in character for pictures.  Everyone seemed to get a kick out of reacting to an angry queen,
but I would bust up laughing in a matter of seconds.
Photo by BMoon Studios.
Lazy Sunday costume of my Medieval Sideless Surcoat.  No wig, corset, makeup, or heels.